 Welcome
 Linux
Linux Unix
Unix Download
Encourage FUNIX
Multimedia
Video editing
- Installation of video editing software
- Editing your video with Kdenlive
- Editing your video with Cinelerra
- Editing your video with OpenShot Video Editor
- Editing your video with Pitivi Video Editor
- Editing your video with Flowblade Video Editor
- Editing your video with Shotcut
Edit your video with kdenlive
Network and system
Email management
Last modified February
23, 2025
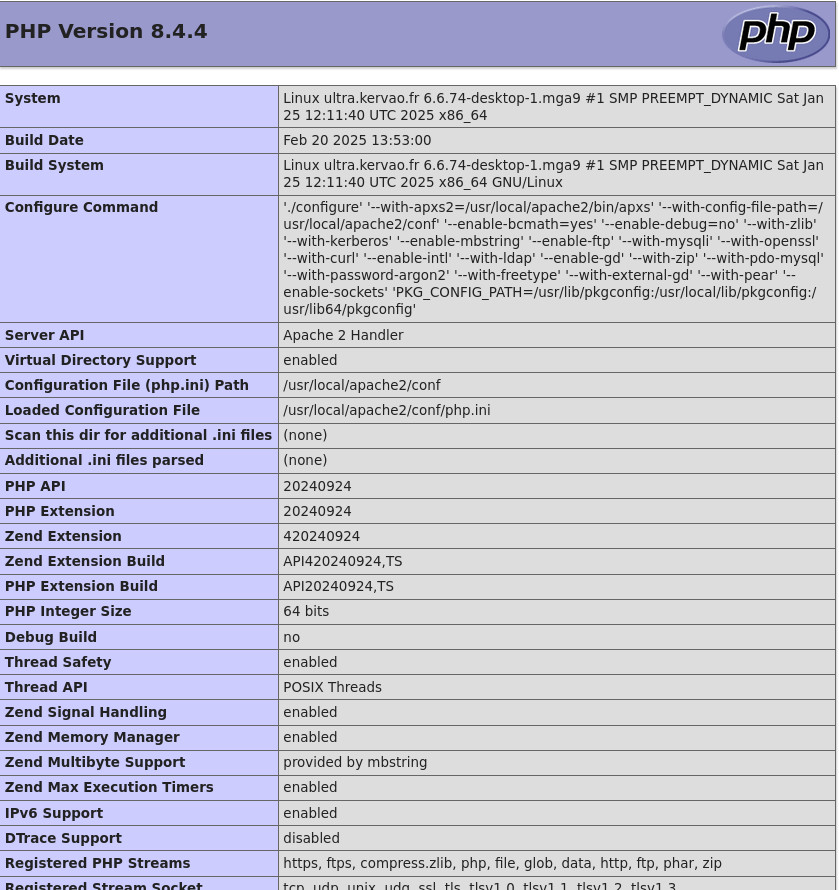
Apache 2.4.63 + PHP 8.4.4 + MariaDB 11.4.5
This site has been automatically translated with Google Translate from this original page written in French, there may be some translation errors.
Presentation
You must first retrieve the Apache sources at the URL httpd.apache.org , then retrieve PHP at the URL www.php.net and finally MariaDB at the URL https://mariadb.org/
To analyze Apache logs , refer to the page " Analyze Apache logs with Webalizer and Awstats ".
To set up a search engine, refer to the page " Hl://Dig "
To set up a secure web server in a "chrooted" environment, see this page (not maintained).
To install a webmail based on Roundcube mail with a LAMP configuration, go to this page .
Installing MariaDB
Compiling MariaDB
tar xvfz mariadb-11.4.5.tar.gz
This creates the mariadb-11.4.5 directory , on my Mageia I had to install the lib64lz4-devel , lib64gnutls-devel , lib64curl-devel and lib64ncurses-devel packages. In the MariaDB directory , we then type:
mkdir build
cd build
cmake ..
here is the result
The following features have
been enabled:
* WSREP, Server
plugin STATIC
* SYSTEMD, Systemd
scripts and notification support
* ARCHIVE, Storage
Engine MODULE
* BLACKHOLE, Storage
Engine MODULE
* CONNECT_VCT,
Support for VCT in the CONNECT storage engine
* CONNECT_LIBXML2,
Support for LIBXML2 in the CONNECT storage engine
* CONNECT_ZIP,
Support for ZIP in the CONNECT storage engine
* CONNECT_REST,
Support for REST API in the CONNECT storage engine
* CONNECT_XMAP,
Support for index file mapping in the CONNECT storage engine
* CONNECT, Storage
Engine MODULE
* CSV, Storage
Engine STATIC
* EXAMPLE, Storage
Engine MODULE
* FEDERATED, Storage
Engine MODULE
* FEDERATEDX,
Storage Engine MODULE
* HEAP, Storage
Engine STATIC
* NUMA, NUMA memory
allocation policy
* INNODB_AHI, InnoDB
Adaptive Hash Index
* INNODB_ROOT_GUESS,
Cache index root block descriptors in InnoDB
* INNOBASE, Storage
Engine STATIC
* MARIABACKUP,
MariaDB Backup Utility
* ARIA, Storage
Engine STATIC
* S3, Storage Engine
MODULE
* MROONGA, Storage
Engine MODULE
* MYISAM, Storage
Engine STATIC
* MYISAMMRG, Storage
Engine STATIC
* PERFSCHEMA,
Storage Engine STATIC
* ROCKSDB, Storage
Engine MODULE
* ROCKSDB_LZ4, LZ4
Compression in the RocksDB storage engine
* ROCKSDB_BZip2,
BZip2 Compression in the RocksDB storage engine
* ROCKSDB_Snappy,
Snappy Compression in the RocksDB storage engine
* ROCKSDB_ZSTD, ZSTD
Compression in the RocksDB storage engine
* ROCKSDB_ZLIB, zlib
Compression in the RocksDB storage engine
* SEQUENCE, Storage
Engine STATIC
* SPHINX, Storage
Engine MODULE
* SPIDER, Storage
Engine MODULE
*
TEST_SQL_DISCOVERY, Storage Engine MODULE
* AUDIT_NULL, Server
plugin MODULE
* AUTH_ED25519,
Server plugin MODULE
* DIALOG_EXAMPLES,
Server plugin MODULE
* AUTH_TEST_PLUGIN,
Server plugin MODULE
* QA_AUTH_INTERFACE,
Server plugin MODULE
* QA_AUTH_SERVER,
Server plugin MODULE
* QA_AUTH_CLIENT,
Server plugin MODULE
* AUTH_0X0100,
Server plugin MODULE
* AUTH_GSSAPI,
Server plugin MODULE
* AUTH_PAM_V1,
Server plugin MODULE
* AUTH_PAM, Server
plugin MODULE
* AUTH_SOCKET,
Server plugin STATIC
* DAEMON_EXAMPLE,
Server plugin MODULE
*
DEBUG_KEY_MANAGEMENT, Server plugin MODULE
* DISKS, Server
plugin MODULE
*
EXAMPLE_KEY_MANAGEMENT, Server plugin MODULE
* FEEDBACK, Server
plugin STATIC
*
FILE_KEY_MANAGEMENT, Server plugin MODULE
* FTEXAMPLE, Server
plugin MODULE
* FUNC_TEST, Server
plugin MODULE
* HANDLERSOCKET,
Server plugin MODULE
*
HASHICORP_KEY_MANAGEMENT, Hashicorp Key Management Plugin
* LOCALES, Server
plugin MODULE
*
METADATA_LOCK_INFO, Server plugin MODULE
*
PASSWORD_REUSE_CHECK, Server plugin MODULE
* PROVIDER_BZIP2,
Server plugin MODULE
* PROVIDER_LZ4,
Server plugin MODULE
* PROVIDER_LZMA,
Server plugin MODULE
* QUERY_CACHE_INFO,
Server plugin MODULE
*
QUERY_RESPONSE_TIME, Server plugin MODULE
* SERVER_AUDIT,
Server plugin MODULE
*
SIMPLE_PASSWORD_CHECK, Server plugin MODULE
* SQL_ERRLOG, Server
plugin MODULE
* TEST_SQL_SERVICE,
Server plugin MODULE
* TYPE_GEOM, Server
plugin STATIC
* TYPE_INET, Server
plugin STATIC
* TYPE_MYSQL_JSON,
Server plugin MODULE
*
TYPE_MYSQL_TIMESTAMP, Server plugin MODULE
* TYPE_TEST, Server
plugin MODULE
* TYPE_UUID, Server
plugin STATIC
* USER_VARIABLES,
Server plugin STATIC
* USERSTAT, Server
plugin STATIC
* TEST_VERSIONING,
Server plugin MODULE
* WSREP_INFO, Server
plugin MODULE
* WSREP_PROVIDER,
Server plugin STATIC
* THREAD_POOL_INFO,
Server plugin STATIC
* PARTITION, Storage
Engine STATIC
* SQL_SEQUENCE,
Storage Engine STATIC
* ONLINE_ALTER_LOG,
Storage Engine STATIC
-- The following OPTIONAL
packages have been found:
* Git
* ZLIB
* Python3
* LibXml2
* Boost (required
version >= 1.40.0)
Required for
the OQGraph storage engine
* GSSAPI
* BZip2
* LZ4 (required
version >= 1.6)
* LibLZMA
* BISON (required
version >= 2.4)
-- The following
RECOMMENDED packages have been found:
* OpenSSL
-- The following REQUIRED
packages have been found:
* Curses
* Threads
*CURL
-- The following features
have been disabled:
* LIBWRAP, Support
for tcp wrappers
* CONNECT_ODBC,
Support for ODBC in the CONNECT storage engine
* CONNECT_JDBC,
Support for JDBC in the CONNECT storage engine
* CONNECT_MONGODB,
Support for MongoDB in the CONNECT storage engine
*
INNODB_EXTRA_DEBUG, Extra InnoDB debug checks
*
AWS_KEY_MANAGEMENT, AWS Encryption Key Management Plugin
* EMBEDDED_SERVER,
Embedded MariaDB Server Library
-- The following OPTIONAL
packages have not been found:
* Java (required
version >= 1.6)
Required for
the CONNECT_JDBC feature
* JNI
Required for
the CONNECT_JDBC feature
* Judy
Required for
the OQGraph storage engine
* LZO
* Snappy
-- Configuring done
(96.4s)
-- Generating done (1.1s)
-- Build files have been
written to: /home/olivier/compilation/mariadb-11.4.5/build
then we type
make
and as root make install
We will add the line /usr/local/lib/mariadb in the file /etc/ld.so.conf and we will type ldconfig .
The executables
are installed by default under /usr/local/mysql/bin ,the libraries will be located under /usr/local/mysql/lib , now for the mariadb headers to be accessible to other software that
would use them, you will need to create the following link
ln -s
/usr/local/mysql/include/mysql /usr/include
you will of course put your absolute path of mysql . If you upgrade MySQL you can go to the next step . Otherwise you must type the following commands:
groupadd mysql
Then the mysql user from the mysql group
useradd mysql -c "MySQL Server" -d /dev/null -g mysql -s /sbin/nologin
We will first
create the directory /var/log/mysqld , and mysql must own it
mkdir
/var/log/mysqld
chown
mysql:mysql /var/log/mysqld
Configuration
Now we will install the configuration file /etc/my.cnf , this is what it will look like
[customer]
#socket location socket
=
/var/run/mysqld/mysqld.sock
[mysqld]
#default path for mariaDB
installation
basedir = /usr/local/mysql
# database path
datadir =
/usr/local/mysql/data/
socket = /var/run/mysqld/mysqld.sock
#temporary directory
tmpdir = /tmp
# miscellaneous
configuration
sql_mode=NO_ENGINE_SUBSTITUTION,STRICT_TRANS_TABLES
we give the rights that go with it
chown
root:sys /etc/my.cnf
chmod 644
/etc/my.cnf
Initializing databases
We will first initialize the databases with the mysql_install_db.sh script which is located in the mariadb-11.4.2/scripts directory , it will need to be modified to avoid errors like this
FATAL ERROR: Could not find
mariadbd
The following directories
were searched:
@mysqld_locations@
or even
./mysql_install_db.sh: line 444: @HOSTNAME@: command not found
we edit it and modify the following lines
resolveip=`find_in_dirs resolveip $bindir`
instead of resolveip=`find_in_dirs resolveip @resolveip_locations@` and
mysqld=`find_in_dirs mariadbd $bindir`
langdir="/usr/local/mysql/share/french"
srcpkgdatadir="/usr/local/mysql/share"
so we replace hostname=`@HOSTNAME@` with hostname=`hostname`
Once corrected, we launch it
bash ./mysql_install_db.sh --user=mysql --basedir=/usr/local/mysql/ --datadir=/usr/local/mysql/data --builddir=/ path /mariadb-11.4.2/
and here is the result
Installing MariaDB/MySQL system tables in
'/usr/local/mysql/data' ...
OK
To start mysqld at boot time you have to copy
support-files/mysql.server to the right place for your system
Two all-privilege accounts were created.
One is root@localhost, it has no password, but you need to
be system 'root' user to connect. Use, for example, sudo mysql
The second is mysql@localhost, it has no password either, but
you need to be the system 'mysql' user to connect.
After connecting you can set the password, if you would need
to be
able to connect as any of these users with a password and
without sudo
See the MariaDB Knowledgebase at https://mariadb.com/kb
You can start the MariaDB daemon with:
cd '/usr/local/mysql/' ; /usr/local/mysql//bin/mysqld_safe
--datadir='/usr/local/mysql/data'
You can test the MariaDB daemon with mysql-test-run.pl
cd '/usr/local/mysql//mysql-test' ; perl mysql-test-run.pl
Please report any problems at https://mariadb.org/jira
The latest information about MariaDB is available at
https://mariadb.org/.
Consider joining MariaDB's strong and vibrant community:
https://mariadb.org/get-involved/
In the configuration presented in this page the databases are located under /usr/local/mysql/data , mysql must be the owner
chown -R mysql:mysql /usr/local/mysql/data
we will also set the rights to 755 otherwise only root will have access to the mysql database
chmod 755 /usr/local/mysql/dataNow we start the server by typing
/usr/local/mysql/bin/mysqld_safe --datadir='/usr/local/mysql/data'
here is the result
220730 17:28:58 mysqld_safe
Logging to '/usr/local/mysql/data/ultra.kervao.fr.err'.
220730 17:28:58
mysqld_safe Starting mariadbd daemon with databases from
/usr/local/mysql/data
We now secure access to the database by typing mysql_secure_installation as root, here is the result
NOTE: RUNNING ALL PARTS OF THIS SCRIPT IS RECOMMENDED FOR ALL MariaDBSERVERS IN PRODUCTION USE! PLEASE READ EACH STEP CAREFULLY!
In order to log into MariaDB to secure it, we'll need the current
password for the root user. If you've just installed MariaDB, and
haven't set the root password yet, you should just press enter here.
Enter current password for root (enter for none):
OK, successfully used password, moving on...
Setting the root password or using the unix_socket ensures that nobody
can log into the MariaDB root user without the proper authorization.
You already have your root account protected, so you can safely answer 'n'.
Switch to unix_socket authentication [Y/n] y
Enabled successfully!
Reloading privilege tables..
...Success!
You already have your root account protected, so you can safely answer 'n'.
Change the root password? [Y/n] n
... skipping.
By default, a MariaDB installation has an anonymous user, allowing anyone
to log into MariaDB without having to have a user account created for
them. This is intended only for testing, and to make the installation
go a bit smoother. You should remove them before moving into a
production environment.
Remove anonymous users? [Y/n]y
...Success!
Normally, root should only be allowed to connect from 'localhost'. This
ensures that someone cannot guess at the root password from the network.
Disallow root login remotely? [Y/n]y
...Success!
By default, MariaDB comes with a database named 'test' that anyone can
access. This is also intended only for testing, and should be removed
before moving into a production environment.
Remove test database and access to it? [Y/n]
- Dropping test database...
...Success!
- Removing privileges on test database...
...Success!
Reloading the privilege tables will ensure that all changes made so far
will take effect immediately.
Reload privilege tables now? [Y/n]
...Success!
Cleaning up...
All done! If you've completed all of the above steps, your MariaDB
installation should now be secure.
Thanks for using MariaDB!
Now we can connect to the base by typing
mariadb -u root -p
Enter password: we enter the password defined above, and here is the result
Welcome to the MariaDB
monitor. Commands end with ; or \g.
Your MariaDB connection id
is 246
Server version:
11.4.2-MariaDB Source distribution
Copyright (c) 2000, 2018,
Oracle, MariaDB Corporation Ab and others.
Type 'help;' or '\h' for
help. Type '\c' to clear the current input statement.
MariaDB [(none)]>
Now refer to the MariaDB page from the creation of other users who will access your database to avoid working under root.
Automatic launch by systemd
With systemd create the file /usr/lib/systemd/system/mariadb.service which contains[Unit]
Description=MariaDB Server
After=syslog.target
After=network.target
[Service]
Type=simple
PermissionsStartOnly=true
ExecStartPre=/bin/mkdir -p /var/run/mysqld
ExecStartPre=/bin/chown mysql:mysql -R /var/run/mysqld
ExecStart=/usr/local/mysql/bin/mariadbd --basedir=/usr/local/mysql --datadir=/usr/local/mysql/data --log-error=/var/log/mysqld/error.log --pid-file=/var/run/mysqld/mysqld.pid --socket=/var/run/mysqld/mysqld.sock
TimeoutSec=300
PrivateTmp=true
User=mysql
Group=mysql
WorkingDirectory=/usr/local
[Install]
WantedBy=multi-user.target
we now launch the MariaDB service by typing
systemctl start mariadb.service
here is the status of the daemon once launched
systemctl status mariadb.service
here is the result
● mariadb.service - MariaDB
Server
Loaded: loaded (/usr/lib/systemd/system/mariadb.service;
enabled; preset: disabled)
Active: active (running) since Fri 2024-08-09 14:11:28 CEST;
8s ago
Process: 2564262 ExecStartPre=/bin/mkdir -p /var/mysql/run
(code=exited, status=0/SUCCESS)
Process: 2564263 ExecStartPre=/bin/chown mysql:mysql -R
/var/mysql/run (code=exited, status=0/SUCCESS)
Main PID:
2564264 (mariadbd)
Tasks: 16 (limit: 9265)
Memory: 111.2M
CPU: 296ms
CGroup: /system.slice/mariadb.service
└─2564264 /usr/local/mysql/bin/mariadbd
--basedir=/usr/local/mysql --datadir=/usr/local/mysql/data
--log-error=/var/log/mysqld/error.log
--pid-file=/var/mysql/run/mysqld.pid
--socket=/var/mysql/run/mysqld.sock
Aug 09 14:11:28
ultra.kervao.fr systemd[1]: Starting mariadb.service...
Aug 09 14:11:28
ultra.kervao.fr systemd[1]: Started mariadb.service.
systemctl enable mariadb.service
In case of update
Right after installing the new version of MariaDB the first thing to do is to restart the daemon
systemctl restart mariadb
You will then need to upgrade the database by typingmariadb-upgrade -u root -p
this will give
Major version upgrade detected from 11.1.2-MariaDB to
11.4.2-MariaDB. Check required!
Phase 1/8: Checking and upgrading mysql database
Processing databases
mysql
mysql.column_stats
OK
mysql.columns_priv
OK
mysql.db
OK
mysql.event
OK
mysql.func
OK
mysql.global_priv
OK
mysql.gtid_slave_pos
OK
mysql.help_category
OK
mysql.help_keyword
OK
mysql.help_relation
OK
mysql.help_topic
OK
mysql.index_stats
OK
mysql.innodb_index_stats
OK
mysql.innodb_table_stats
OK
mysql.plugin
OK
mysql.proc
OK
mysql.procs_priv
OK
mysql.proxies_priv
OK
mysql.roles_mapping
OK
mysql.servers
OK
mysql.table_stats
OK
mysql.tables_priv
OK
mysql.time_zone
OK
mysql.time_zone_leap_second
OK
mysql.time_zone_name
OK
mysql.time_zone_transition
OK
mysql.time_zone_transition_type
OK
mysql.transaction_registry
OK
Phase 2/8: Installing used storage engines... Skipped
Phase 3/8: Running 'mysql_fix_privilege_tables'
(...)
roundcubemail.session OKroundcubemail.system OK
roundcubemail.users OK
spamassassin
spamassassin.userpref OK
syncstorage_rs
syncstorage_rs.__diesel_schema_migrations OK
syncstorage_rs.batch_upload_items OK
syncstorage_rs.batch_uploads OK
syncstorage_rs.bso OK
syncstorage_rs.collections OK
syncstorage_rs.user_collections OK
sys
sys.sys_config OK
tokenserver_rs
tokenserver_rs.__diesel_schema_migrations OK
tokenserver_rs.nodes OK
tokenserver_rs.services OK
tokenserver_rs.users OK
Phase 7/8: uninstalling plugins
Phase 8/8: Running 'FLUSH PRIVILEGES'
OK
La mise à jour de la base est terminée, si la mise à jour est inutile vous aurez un message comme celui là
This installation of MariaDB is already upgraded to
11.4.2-MariaDB.
There is no need to run mariadb-upgrade again for
11.4.5-MariaDB.
You can use --force if you still want to run mariadb-upgrade
en revanche si vous avez l'erreur suivante
Error : Cannot load from mysql.proc. The
table is probably corrupted
error : Corrupt
sys.io_by_thread_by_latency
Error : Cannot load from mysql.proc. The table
is probably corrupted
error : Corrupt
sys.io_global_by_file_by_bytes
Error : Cannot load from mysql.proc. The table
is probably corrupted
error : Corrupt
sys.io_global_by_file_by_latency
Error : Cannot load from mysql.proc. The table
is probably corrupted
error : Corrupt
sys.io_global_by_wait_by_bytes
Error : Cannot load from mysql.proc. The table
is probably corrupted
error : Corrupt
il faudra retaper la commande en rajoutant
mariadb-upgrade -u root -p --force
Il faudra ensuite relancer le serveur
systemctl restart mariadb
Setting up an encrypted connection with MariaDB
Now to create a secure connection we will create the /etc/mysql and /etc/mysql/ssl directory . We go to /etc/mysql/ssl and generate a private RSA key for the home certification authority (CA for Certificate Authority). It is obvious that the certificates and keys of your CA will only be valid on your internal network, unless you are a recognized and registered CA on the internet! If your site is accessible via the internet I advise you to create a certificate that will be valid on the internet with let's encrypt .
openssl genrsa 2048 > ca-key.pem
here is the result
Generating RSA private key,
2048 bit long modulus
..............................................................................++++
.............++++++
e is 65537 (0x010001)
we now create the CA certificate based on the previously created key by typing
openssl req -new -x509 -nodes -days 365000 -key ca-key.pem -out ca-cert.pem
here is the result
You are about to be asked to enter information that will be incorporatedinto your certificate request.
What you are about to enter is what is called a Distinguished Name or a DN.
There are quite a few fields but you can leave some blank
For some fields there will be a default value,
If you enter '.', the field will be left blank.
-----
Country Name (2 letter code) [XX]:FR
State or Province Name (full name) [Default Province]:
Locality Name (eg, city) [Default City]:
Organization Name (eg, company) [Default Company Ltd]:
Organizational Unit Name (eg, section) []:
Common Name (eg server FQDN or YOUR name) []: ca-mariadb
Email Address []:olivier.hoarau@funix.org
..............................................++++++
...............+++++
writing new private key to 'server-key.pem'
-----
You are about to be asked to enter information that will be incorporated
into your certificate request.
What you are about to enter is what is called a Distinguished Name or a DN.
There are quite a few fields but you can leave some blank
For some fields there will be a default value,
If you enter '.', the field will be left blank.
-----
Country Name (2 letter code) [XX]:FR
State or Province Name (full name) [Default Province]:None
Locality Name (eg, city) [Default City]: None
Organization Name (eg, company) [Default Company Ltd]: None
Organizational Unit Name (eg, section) []: None
Common Name (eg server FQDN or YOUR name) []: server-mariadb
Email Address []:olivier.hoarau@funix.org
Please enter the following 'extra' attributes
to be sent with your certificate request
A challenge password []:
An optional company name []:
subject=C = FR, ST = None, L = None, O = None, OU = None, CN = server-mariadb, emailAddress = olivier.hoarau@funix.org
Getting CA Private Key
.......+++++
................+++++
writing new private key to 'client-key.pem'
-----
You are about to be asked to enter information that will be incorporated
into your certificate request.
What you are about to enter is what is called a Distinguished Name or a DN.
There are quite a few fields but you can leave some blank
For some fields there will be a default value,
If you enter '.', the field will be left blank.
-----
Country Name (2 letter code) [XX]:FR
State or Province Name (full name) [Default Province]:None
Locality Name (eg, city) [Default City]:None
Organization Name (eg, company) [Default Company Ltd]:None
Organizational Unit Name (eg, section) []:None
Common Name (eg server FQDN or YOUR name) []:client-mariadb
Email Address []:olivier.hoarau@funix.org
Please enter the following 'extra' attributes
to be sent with your certificate request
A challenge password []:
An optional company name []:None
subject=C = FR, ST = None, L = None, O = None, OU = None, CN = client-mariadb, emailAddress = olivier.hoarau@funix.org
Getting CA Private Key
client-cert.pem: OK
error client-cert.pem: verification failed
[customer]
ssl-ca=/etc/mysql/ssl/ca-cert.pemssl-cert=/etc/mysql/ssl/client-cert.pem
ssl-key=/etc/mysql/ssl/client-key.pem
ssl-cert=/etc/mysql/ssl/server-cert.pem
ssl-key=/etc/mysql/ssl/server-key.pem
We restart the server
systemctl restart mariadb
and we type
mariadb -u root -p
Enter password:
Welcome to the MariaDB
monitor. Commands end with ; or \g.
Your MariaDB connection id
is 9
Server version:
11.4.2-MariaDB Source distribution
Copyright (c) 2000, 2018,
Oracle, MariaDB Corporation Ab and others.
Type 'help;' or '\h' for
help. Type '\c' to clear the current input statement.
MariaDB [(none)]>
status
--------------
mariadb from
11.4.2-MariaDB, client 15.2 for Linux (x86_64) using
readline 5.1
Connection id: 9
Current database:
Current user:
olivier@ultra.kervao.fr
SSL: Cipher in use is
TLS_AES_256_GCM_SHA384, cert is OK
Current pager: stdout
Using outfile: ''
Using delimiter: ;
Server: MariaDB
Server version:
11.4.2-MariaDB Source distribution
Protocol version: 10
Connection:
mariadb-serveur via TCP/IP
Server characterset:
latin1
Db characterset: latin1
Client characterset:
utf8mb3
Conn. characterset:
utf8mb3
TCP port: 3306
Uptime: 1 min 27 sec
Threads: 2 Questions: 63
Slow queries: 0 Opens: 39 Open tables: 32 Queries per second
avg: 0.724
--------------
And
+----------------------+--------------------------------+
| Variable_name | Value |
+----------------------+--------------------------------+
| have_openssl | YES |
| have_ssl | YES |
| ssl_ca |
/etc/mysql/ssl/ca-cert.pem |
| ssl_capath | |
| ssl_cert |
/etc/mysql/ssl/server-cert.pem |
| ssl_cipher | |
| ssl_crl | |
| ssl_crlpath | |
| ssl_key |
/etc/mysql/ssl/server-key.pem |
| version_ssl_library |
OpenSSL 3.0.14 Jun 4, 2024 |
+----------------------+--------------------------------+
10 rows in set (0.002 sec)
That's it, you're in a secure connection. To go further you can consult this page which will tell you (for example) how to force encrypted connections by user, machine, or other.
Attention, attention, if you now connect by simply typing
mysql -u root -p
you are likely to get the following error
ERROR 2026 (HY000): TLS/SSL error: Validation of SSL server certificate failed
You will need to specify the name of the server that was used to create the certificate, the command
mysql -u root -p -h mariadb-serveur -e status
will give thus
--------------
mysql from 11.4.2-MariaDB,
client 15.2 for Linux (x86_64) using readline 5.1
Connection id: 23
Current database:
Current user:
olivier@ultra.kervao.fr
SSL: Cipher in use is
TLS_AES_256_GCM_SHA384, cert is OK
Current pager: stdout
Using outfile: ''
Using delimit: ;
Server: MariaDB
Server version:
11.4.2-MariaDB Source distribution
Protocol version: 10
Connection:
mariadb-serveur via TCP/IP
Server characterset:
latin1
Db characterset: latin1
Client characterset:
utf8mb3
Conn. characterset:
utf8mb3
TCP port: 3306
Uptime: 12 min 2 sec
Threads: 1 Questions: 169
Slow queries: 0 Opens: 24 Open tables: 17 Queries per second
avg: 0.234
--------------
Lost administrator password
If you have lost the root password to reset it you must stop the server
systemctl stop mariadb
We restart the daemon by disabling network identification and listening (in order to avoid being hacked at this time when MariaDB is vulnerable):
/usr/local/mysql/bin/mariadbd --user=mysql --skip-grant-tables --skip-networking &
Now we change the password by connecting to the mysql database
/usr/local/mysql/bin/mariadb mysql -u root
Reading table information
for completion of table and column names
You can turn off this
feature to get a quicker startup with -A
Welcome to the MariaDB
monitor. Commands end with ; or \g.
Your MariaDB connection
id is 25
Server version:
11.4.2-MariaDB Source distribution
Copyright (c) 2000,
2018, Oracle, MariaDB Corporation Ab and others.
Query OK, 4
rows affected (0.06 sec)
Rows
matched: 4 Changed: 4 Warnings: 0
The changes are taken into account by typing the following command:
MariaDB
[(mysql)] > FLUSH PRIVILEGES;
Query OK, 0
rows affected (0.04 sec)
we then restart the mariadb daemon
systemctl restart mariadb
Installing Apache
Apache Compilation
For Apache , we will first install the lib64expat-devel package , we unarchive by typing:tar xvfz httpd-2.4.63.tar.gz
This will create the httpd-2.4.63 directory .
You will
first need to install the apr and apr-util tools, which you will download from the apr.apache.org website . Unzip the first archive by typing
tar xvfz apr-1.7.5.tar.gz
this gives the directory apr-1.7.5 in which we type successively
./configure
make
then as root
make install
Now we edit the file /etc/ld.so.conf and add the following line
/usr/local/apr/lib
we unzip the second archive by typing
tar xvfz
apr-util-1.6.3.tar.gz
this gives the directory apr-util-1.6.3 we type successively
./configure --with-apr= /absolute-path/ apr-1.7.5 --with-crypto --with-openssl=/usr/local/ssl/lib
make
then as root
make install
ldconfig
In the Apache httpd-2.4.63 directory , we then type:
./configure --prefix=/usr/local/apache2 --enable-modules=most
By prefix we indicate that the Apache directories containing among other things the conf file will be located under /usr/local/apache2 this is useful in the case where you want to make two versions of Apache coexist on your system. We now type:
make
And finally as root:
make install
Add the line /usr/local/apache2/lib in the file /etc/ld.so.conf then type
ldconfig
To now launch Apache , type:
/usr/local/apache2/bin/apachectl start
Now your favorite browser in the URL field type http://localhost or http://machinename and there the Apache home page appears (or at least an It Works!! ), for info this is located under /usr/local/apache2/htdocs .
NOTE If you upgrade from an older version, your conf files will not be overwritten.
Apache Tree Overview
The installation will create a directory /usr/local/apache2 containing:- auth directory which contains encrypted passwords for
password-enabled web pages
- bin directory contains Apache executables
- cgi-bin directory contains CGI scripts
- error directory contains error messages in multiple
languages, the language is chosen based on the browser
configuration. The messages are fully configurable.
- lib directory contains libraries
- build directory contains various build configuration
parameters
- conf directory contains Apache configuration
files
- htdocs directory contains the Apache home page
- icons directory contains icons that are used to identify
file types.
- include directory contains Apache includes
- modules directory contains Apache modules
- logs directory contains Apache log files
- man directory contains Apache manuals
The log directory essentially
contains two files:
- access_log listing accesses to the server
- error_log listing errors of all kinds
The modules directory contains the modules that Apache can use . For your information, a module is a software extension to Apache , allowing it to interpret PHP for example (module libphp.so ). Only dynamically loaded modules are in this directory.
The directory /usr/local/apache2/conf contains:
- the Apache configuration
file http.conf
- mime.types sets the file type according to the extension of
the said file (. doc = msword, . ps = postscript,
...), this allows the client who connects to the server, to
know how to interpret the file according to its extension.
- magic is used for the mod_mime_magic module
You will also find a bunch of other config files provided as examples in the extra and original directories .
The Apache configuration file
The Apache conf file is located under /usr/local/apache2 and is named httpd.conf , here are the points that I consider important in the file:(...)
# Apache ServerRoot Root
Directory
"/usr/local/apache"
(...)
# define the server port
IP address
# Listen: Allows you to
bind Apache to specific IP addresses and/or
# ports, in addition to
the default. See also the <VirtualHost>
# directive.
#
# Change this to Listen
on specific IP addresses as shown below to
# prevent Apache from
glomming onto all bound IP addresses (0.0.0.0)
#
#Listen 12.34.56.78:80
# with a second apache
server, you can specify a port 8080
# in the browser url you
will have to put http://url:8080
Listen 80
(...)
# loading add-ons
LoadModule
authn_file_module modules/mod_authn_file.so
LoadModule
authn_core_module modules/mod_authn_core.so
LoadModule
authz_host_module modules/mod_authz_host.so
LoadModule
authz_groupfile_module modules/mod_authz_groupfile.so
LoadModule
authz_user_module modules/mod_authz_user.so
LoadModule
authz_core_module modules/mod_authz_core.so
LoadModule
access_compat_module modules/mod_access_compat.so
LoadModule
auth_basic_module modules/mod_auth_basic.so
LoadModule
socache_shmcb_module modules/mod_socache_shmcb.so
LoadModule
reqtimeout_module modules/mod_reqtimeout.so
LoadModule filter_module
modules/mod_filter.so
LoadModule mime_module
modules/mod_mime.so
LoadModule
log_config_module modules/mod_log_config.so
LoadModule env_module
modules/mod_env.so
LoadModule
headers_module modules/mod_headers.so
LoadModule
setenvif_module modules/mod_setenvif.so
LoadModule
version_module modules/mod_version.so
LoadModule ssl_module
modules/mod_ssl.so
LoadModule unixd_module
modules/mod_unixd.so
LoadModule status_module
modules/mod_status.so
LoadModule
autoindex_module modules/mod_autoindex.so
LoadModule cgid_module
modules/mod_cgid.so
LoadModule dir_module
modules/mod_dir.so
LoadModule alias_module
modules/mod_alias.so
LoadModule
rewrite_module modules/mod_rewrite.so
LoadModule wsgi_module
modules/mod_wsgi.so
LoadModule php7_module
modules/libphp7.so
# httpd is initially
launched as root, then immediately
# the user nobody (group
nobody) becomes the owner
# so if there is a flaw
in Apache, the hacker instead of becoming root
# becomes daemon with the
rights that go with it
# to check that daemon is
indeed the owner
# ps aux | grep httpd
User daemon
Group dameon
# ServerAdmin: Your
address, where problems with the server should be
# e-mailed. This address
appears on some server-generated pages, such
# as error documents.
# In case of problem an
email will be sent to the webmaster, so put
# here the email address
of the webmaster
ServerAdmin
olivier@asterix.kervao.fr
(...)
# DocumentRoot: The
directory out of which you will serve your
# documents. By default,
all requests are taken from this directory, but
# symbolic links and
aliases may be used to point to other locations.
# It is in this directory
that we will find the Apache DocumentRoot home page
"/usr/local/apache/htdocs"
(...)
# Defining DirectoryIndex
entry files
index.html index.html.var
index.htm index.php index.php index.php7
(...)
# error file name
ErrorLog logs/error_log
# log level
# LogLevel: Control the
number of messages logged to the error_log.
# Possible values
include: debug, info, notice, warn, error, crit,
# alert, emerg.
#
LogLevel warn
(...)
# order of language
preference
# LanguagePriority allows
you to give precedence to some languages
# in case of a tie
during content negotiation.
#
# Just list the languages
in decreasing order of preference. We have
# more or less
alphabetized them here. You probably want to change this.
#
LanguagePriority fr en da
nl et de el it ja kr no pl pt pt-br ltz ca es sv tw
As it stands, this is
largely sufficient as a configuration to run an Apache server . We will see later how to customize it and
go further.
Automatic application launch with systemd
For automatic launch, you will need to create the file /usr/lib/systemd/system/httpd.service beforehand[Unit]
Description=Apache Web Server
After=network.target remote-fs.target nss-lookup.target
[Service]
Type=forking
ExecStart=/usr/local/apache2/bin/apachectl start
ExecStop=/usr/local/apache2/bin/apachectl graceful-stop
ExecReload=/usr/local/apache2/bin/apachectl graceful
PrivateTmp=true
LimitNOFILE=infinity
[Install]
WantedBy=multi-user.target
Please note that the directory /var/run/httpd must be created beforehand. We launch Apache by typing systemctl start httpd.
Here is the result by typing systemctl status httpd
● httpd.service - Apache
Web Server
Loaded: loaded (/usr/lib/systemd/system/httpd.service;
enabled; preset: disabled)
Active: active (running) since Thu 2024-08-08 15:54:29 CEST;
18s ago
Process: 2073587 ExecStart=/usr/local/apache2/bin/apachectl
start (code=exited, status=0/SUCCESS)
Main PID:
2073590 (httpd)
Tasks: 83 (limit: 9265)
Memory: 17.2M
CPU: 189ms
CGroup: /system.slice/httpd.service
├─2073590 /usr/local/apache2/bin/httpd -k start
├─2073591 /usr/local/apache2/bin/httpd -k start
├─2073592 /usr/local/apache2/bin/httpd -k start
├─2073593 /usr/local/apache2/bin/httpd -k start
└─2073594 /usr/local/apache2/bin/httpd -k start
Aug 08 15:54:28
ultra.kervao.fr systemd[1]: Starting httpd.service...
to have apache launched automatically at each startup, type systemctl enable httpd.service
Installing PHP
Compiling PHP
For php, we will first need oniguruma which we will get here https://github.com/kkos/oniguruma/releases we unzip the archive by typing:
tar xvfz onig-6.9.10.tar.gz
this gives the onig-6.9.10 directory in which we type
./autogen.sh
./configure
make
then as root
make install
we will also install the
packages argon2 , argon2-devel , lib64gd-devel , lib64zip-devel and lib64sqlite3-devel
You will need to install APCU
so that zoneminder
can work with zmNinja, the official site is
https://pecl.php.net/package/APCU we will recover the
archive which we decompress by typing
tar xvfz apcu-5.1.24.tgz
this gives the apcu-5.1.24 directory in which we type
./configure
make
then as root make install
we return to php which we unzip by typing
tar xvfj php-8.4.4.tar.bz2
This will create a directory php-8.4.4 . Now in the php directory you will type./configure --with-apxs2=/usr/local/apache2/bin/apxs --with-config-file-path=/usr/local/apache2/conf --enable-bcmath=yes --enable-debug=no --with-zlib --with-kerberos --enable-mbstring --enable-ftp --with-mysqli --with-openssl --with-curl --enable-intl --with-ldap --enable-gd --with-zip --with-pdo-mysql --with-password-argon2 --with-freetype --with-external-gd --with-pear --enable-sockets
Type now
make
Then as root
make install
This last command will install the PHP module under /usr/local/apache2/modules and modify the httpd.conf file by adding
LoadModule php_module modules/libphp.so
Configuration
We will now manually modify
the httpd.conf file so that Apache takes PHP into account ,
following the lines
AddType
application/x-compress .Z
AddType application/x-gzip
.gz .tgz
We add
AddType
application/x-httpd-php .php .phtml
AddType
application/x-httpd-php-source .phps
Moreover, on the line
DirectoryIndex index.html
We will add
DirectoryIndex index.html index.htm index.php
Now we will copy the php.ini-production file located in the PHP directory to put it under /usr/local/apache2/conf and rename it php.ini
cp php.ini-production /usr/local/apache2/conf/php.ini
In the case of an old php
installation ,
you should start from the new php-dist.ini file provided and modify it again. In the /usr/local/apache/htdocs
directory we find the files that will
be accessible from the home page of your Apache server .
We restart Apache
systemctl restart httpd
Now create the file infophp.php containing
<?php
phpinfo();
?>
Which you will place under /usr/local/apache2/htdocs, in the URL of your favorite browser, type http://localhost/infophp.php or http://machinename/infophp.php and there magic should display information on the configuration of PHP on your system.
ATTENTION for optimal operation of mysql with php, it will be necessary to specify the path of mysql socket file in the php.ini file
pdo_mysql.default_socket=/var/run/mysqld/mysqld.sock
otherwise with phpMyAdmin you might get an error like#2002 - The server is not responding. (or the socket interface to the local MySQL server is not configured correctly)
Advanced Apache Configuration
User web pages
In the httpd.conf file we must addUserDir public_html
<Directory "/home/*/public_html">
Options Indexes FollowSymLinks Includes ExecCGI
AllowOverride All
Require all granted
</Directory>
UserDir /home/httpd
So for the user toto when you type as URL http://apache-server/~toto , apache will look for the index.htm file under /home/httpd/toto. We can go further by specifying a particular directory, /home/httpd/toto/html for example, by writing:
UserDir /home/httpd/*/html
Aliases
Alias
/icons/ "/usr/local/apache/icons/"
Alias /doc
"/usr/doc/html/"
we then add for each of the
directories
<Directory "/usr/doc/html">
Options
Indexes FollowSymLinks Includes ExecCGI
AllowOverride All
Require all granted
</Directory>
NOTE If you put /doc/ instead of /doc in the URL you will have to type http://obelix/doc/ , if you omit the last /, you will get an error.
Protecting a page
# definition
of page protection files
AccessFileName .htaccess
you obviously have to restart apache.
All files with limited access must be concentrated in the same directory /home/olivier/public_html/reserve for example, you just need to create a file in it that you will have to name .htaccess containing:
AuthUserFile
auth/olivier.users
AuthGroupFile
auth/olivier.group
AuthName "Restricted
Access"
AuthType Basic
require group authorized
The olivier.users file will
contain a list of users, it will be located under the /usr/local/apache2/auth directory (possibly to be created), for your
information you can change the /usr/local/apache2 path by modifying the value of the ServerRoot variable found in the httpd.conf file. The olivier.group file corresponds
to a list of groups of people, these same people having been
defined in the olivier.users file. The principle is to create a group of
authorized people and to assign them a password to each, only
this group will be able to access the reserved section.
To create these files, as
root, you just have to create the /usr/local/apache2/auth directory , then type:
htpasswd -c /usr/local/apache2/auth/olivier.users olivier
For info this executable is located in the Apache installation directory precisely under httpd-2.4.54/support. The -c option corresponds to the creation of the olivier.users file. We will then have to enter a password for the user olivier.
New password:
We confirm
Re-type new
password:
Adding password for user
olivier
To create another user veronique you will type the same command without the creation option:
htpasswd /etc/httpd/auth/olivier.users veronique
Still as root, create the file /usr/local/apache2/auth/olivier.group which will contain the list of people authorized to access the reserved pages:
authorized: olivier veronique
Now when from your favorite browser when you enter as URL http://obelix/~olivier/reserve , you will have a popup window that will open asking you to enter your username and the password previously entered.
Note that to prevent someone from peeking into your users' .htaccess files, the httpd.conf file must contain the following directive:
<Files ~
"^\.ht">
Order
allow,deny
Deny
from all
Satisfy
All
</Files>
Virtual Hosts
We will add everything at the end of the file:
<VirtualHost
192.168.13.11>
ServerName
obelix.breizland.bz
DocumentRoot
/usr/local/apache2/htdocs
ErrorLog
logs/obelix-error_log
TransferLog
logs/obelix-access_log
</VirtualHost>
<VirtualHost
192.168.13.11>
ServerName
www.asterix.breizland.bz
DocumentRoot
/usr/local/asterix
ErrorLog
logs/asterix-error_log
TransferLog
logs/asterix-access_log
</VirtualHost>
<VirtualHost
192.168.13.11>
ServerName
www.idefix.breizland.bz
DocumentRoot
/usr/local/idefix
ErrorLog
logs/idefix-error_log
TransferLog
logs/idefix-access_log
</VirtualHost>
for each of the directories I must then create the following instructions
<Directory
"/usr/local/asterix">
Options
Indexes FollowSymLinks Includes ExecCGI
AllowOverride
All
Require all
granted
</Directory>
Restart Apache by typing:
systemctl restart httpd
Now we will create our asterix and idefix hosts , add www.asterix.breizland.bz and www.idefix.breizland.bz in /etc/hosts on the same line as your Apache server ( obelix in our example).
192.168.13.11 obelix obelix.breizland.bz www.asterix.breizland.bz www.idefix.breizland.bz
Normally if you ping www.idefix.breizland.bz it should work, for client stations you will have to add the same line in the hosts file (not necessary). Now in the URL field of your favorite browser:
http://www.asterix.breizland.bz
And there, normally you should see the page that you placed under /usr/local/asterix displayed
In the event
that you are using two Apache servers (versions 1.3 and 2 for example), you can specify
port 80 for Apache 1.3 and port 8080 for Apache 2 by setting Listen to 8080 in the
configuration file. When declaring virtual hosts, you will need to put
something like this
<VirtualHost
192.168.13.11:8080>
ServerName
tosh.kervao.fr
DocumentRoot
/usr/local/apache2/htdocs
ErrorLog
logs/tosh-error_log
TransferLog
logs/tosh-access_log
</VirtualHost>
Make your server accessible from the internet
First, you will
need to open a route from the box to the server. For me, the
topology is as follows:
Box -> TP-Link Archer Router -> LAMP Server
On the box I open a route on port 80 ( http ) to port 80 of the Archer router and another route on port 443 ( https ) to port 443 of the Archer router. Then I open a route from the router to the LAMP server on port 80 and another on port 443. All this using the TCP protocol . The connection on port 443 will be used later for setting up the encrypted connection
Box 80 -> Router 80 -> LAMP Server 80
Box 443 -> Router 443 -> LAMP Server 443
If the server is running on port 8080, we can put 8080 from end to end or do a port redirection so that it is transparent to the internet and we do not have to indicate :8080 at the end of the URL
Box 80-> Router 80 -> LAMP Server 8080
Now the problem with IP addresses when you are an individual is that the address can change, it is necessary to subscribe to certain services like No-IP which allows you to have a fixed address on the internet.
Then you will need to open the corresponding ports with shorewall . There should be the following two lines, the first one that opens the two ports on the local network and the second one that opens the ports on the internet
ACCEPT
lan:192.168.2.0/24 fw tcp 80,443,8080
ACCEPT lan fw:192.168.13.11 tcp 80,443
Encrypt connections with SSL with a self-signed certificate
In this case we will create a self-signed personal certificate that will work with a security exception, including on your server that is accessible from the internet, as I was able to do for sendmail and dovecot . We will ensure that the /etc/ssl/apache and /etc/ssl/public directories are previously created.
openssl req -new -x509
              -nodes -out /etc/ssl/public/apache.crt -keyout
              /etc/ssl/apache/apache.key
voilà le résultat
Generating a 2048 bit RSA private key
...+++
...................+++
writing new private key to
'/etc/ssl/apache/apache.key'
-----
You are about to be asked
to enter information that will be incorporated into your
certificate request.
What you are about to
enter is what is called a Distinguished Name or a DN.
There are quite a few
fields but you can leave some blank
For some fields there will
be a default value,
If you enter '.', the
field will be left blank.
-----
Country Name (2 letter
code) [AU]:FR
State or Province Name
(full name) [Some-State]:Bretagne
Locality Name (eg, city)
[]:Brest
Organization Name (eg,
company) [Internet Widgits Pty Ltd]:None
Organizational Unit Name
(eg, section) []:None
Common Name (eg server
FQDN or YOUR name) []: www.asterix.breizland.bz
Email Address []:olivier.hoarau@funix.org
We will now modify the apache configuration file /usr/local/apache2/conf/httpd.conf by activating the following modules
LoadModule ssl_module
modules/mod_ssl.so
LoadModule
log_config_module modules/mod_log_config.so
LoadModule setenvif_module
modules/mod_setenvif.so
LoadModule
socache_shmcb_module modules/mod_socache_shmcb.so
# Secure (SSL/TLS) connections
Include conf/extra/httpd-ssl.conf
#
# Note: The following must must be present to support
# starting without SSL on platforms with no /dev/random equivalent
# but a statically compiled-in mod_ssl.
#
further in the file at the level of the declaration of a virtual host we will write
<VirtualHost 192.168.0.13:443>
ServerName funix.kervao.fr
DocumentRoot /data/homepage/www.funix.org
ErrorLog logs/funix-error_log
TransferLog logs/funix-access_log
SSLEngine on
# on pointe vers le certificat et la clé privée
SSLCertificateFile /etc/ssl/public/apache.crt
SSLCertificateKeyFile /etc/ssl/apache/apache.key
</VirtualHost>
if you want to redirect the entire flow 80 to port 443 of your host, you will have to add the following directive
<VirtualHost 192.168.0.13:80>
ServerName funix.kervao.fr
# on redirige les connexions sur le port classique 80 vers le
port 443 utilisé par SSL
Redirect / https://funix.kervao.fr/
</VirtualHost>
while making sure that the redirection to port 443 is in place
<VirtualHost
192.168.0.13:443>
ServerName funix.kervao.fr
DocumentRoot
/data/homepage/www.funix.org
ErrorLog
logs/funix-error_log
TransferLog
logs/funix-access_log
SSLEngine on
# we point to the
certificate and private key
SSLCertificateFile
/etc/ssl/public/apache.crt
SSLCertificateKeyFile
/etc/ssl/apache/apache.key
</VirtualHost>
In the file /usr/local/apache2/conf/extra/httpd-ssl.conf we find
## When we also provide SSL we have to listen to the
# standard HTTP port (see above) and to the HTTPS port
Listen 443
# SSL Cipher Suite:
# List the ciphers that the client is permitted to negotiate,
# and that httpd will negotiate as the client of a proxied server.
# See the OpenSSL documentation for a complete list of ciphers, and
# ensure these follow appropriate best practices for this deployment.
# httpd 2.2.30, 2.4.13 and later force-disable aNULL, eNULL and EXP ciphers,
# while OpenSSL disabled these by default in 0.9.8zf/1.0.0r/1.0.1m/1.0.2a.
SSLCipherSuite HIGH:MEDIUM:!MD5:!RC4
SSLProxyCipherSuite HIGH:MEDIUM:!MD5:!RC4
# User agents such as web browsers are not configured for the user's
# own preference of either security or performance, therefore this
# must be the prerogative of the web server administrator who manages
# cpu load versus confidentiality, so enforce the server's cipher order.
SSLHonorCipherOrder on
# SSL Protocol support:
# List the protocol versions which clients are allowed to connect with.
# Disable SSLv3 by default (see RFC 7525 3.1.1). TLSv1 (1.0) should be
# disabled as quickly as practical. By the end of 2016, only the TLSv1.2
# protocol or later should remain in use.
SSLProtocol all -SSLv3
SSLProxyProtocol all -SSLv3
# Pass Phrase Dialog:
# Configure the pass phrase gathering process.
# The filtering dialog program (`builtin' is an internal
# terminal dialog) has to provide the pass phrase on stdout.
SSLPassPhraseDialog builtin
# Inter-Process Session Cache:
# Configure the SSL Session Cache: First the mechanism
# to use and second the expiring timeout (in seconds).
#SSLSessionCache "dbm:/usr/local/apache2/logs/ssl_scache"
SSLSessionCache "shmcb:/usr/local/apache2/logs/ssl_scache(512000)"
SSLSessionCacheTimeout 300
everything else is in comments, we restart apache
systemctl stop httpd.service
systemctl start httpd.service
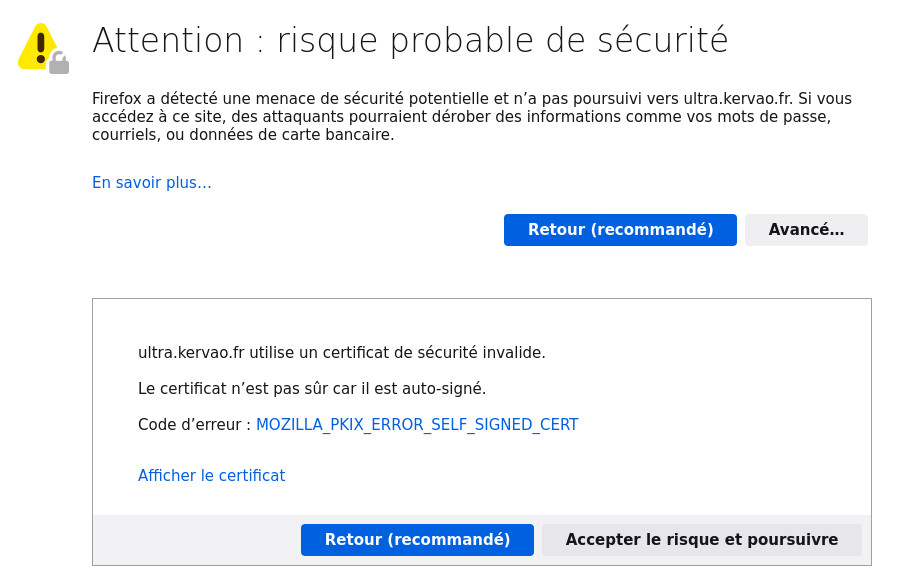
we think about opening port 443 on the firewall and we connect normally to the site. The first time with a self-signed personal certificate not recognized by a certification authority, we will have to accept the security exception, by clicking on Accept the risk and continue
We can now surf the site securely.
To go further on the subject, see the very complete Apache documentation on this subject.
Encrypt connections with SSL with a let's encrypt certificate
If your site is accessible
via the internet as explained above , I advise you to create a certificate that will be
valid on the internet with let's encrypt . For my mageia I relied on this page , we will
first install the lib64augeas-devel package and then type as root the successive
commands:
python3 -m venv
/opt/certbot/
/opt/certbot/bin/pip
install --upgrade pip
This is the result
Requirement already
satisfied: pip in /opt/certbot/lib/python3.10/site-packages
(23.0.1)
Collecting pip
Downloading
pip-25.0-py3-none-any.whl (1.8 MB)
━━━━━━━━━━━━━━━━━━━━ ━━━━━━━━━━━━━━━━━━━━ 1.8/1.8 MB 6.9
MB/s eta 0:00:00
Installing collected
packages: pip
Attempting
uninstall: pip
Found
existing installation: pip 23.0.1
Uninstalling pip-23.0.1:
Successfully uninstalled
pip-23.0.1
Successfully installed
pip-25.0
Then
/opt/certbot/bin/pip install certbot certbot-apache
here is the result
Collecting certbot
Downloading
certbot-3.1.0-py3-none-any.whl.metadata (7.9 kB)
Collecting certbot-apache
Downloading
certbot_apache-3.1.0-py3-none-any.whl.metadata (1.3 kB)
Collecting acme>=3.1.0
(from certbot)
Downloading
acme-3.1.0-py3-none-any.whl.metadata (1.3 kB)
Collecting
ConfigArgParse>=1.5.3 (from certbot)
Downloading
ConfigArgParse-1.7-py3-none-any.whl.metadata (23 kB)
(...)
Downloading
urllib3-2.3.0-py3-none-any.whl (128 kB)
Using cached
pycparser-2.22-py3-none-any.whl (117 kB)
Building wheels for
collected packages: python-augeas
Building wheel for
python-augeas (pyproject.toml) ... done
Created wheel for
python-augeas: filename=python_augeas-1.1.0-py3-none-any.whl
size=21254
sha256=36a415257635e6d1f8c6d86e979e3942a1cff4d0582e8d7be3a55aa7be9dfa71
Stored in
directory:
/root/.cache/pip/wheels/b6/10/67/b10ab09e701005d015b7be1488a552f221f5e065645c6f39ee
Successfully built
python-augeas
Installing collected
packages: pytz, pyrfc3339, parsedatetime, urllib3,
typing-extensions, pycparser, idna, distro, configobj,
ConfigArgParse, charset-normalizer, certifi, requests, cf
fi, python-augeas,
cryptography, PyOpenSSL, josepy, acme, certbot,
certbot-apache
Successfully installed
ConfigArgParse-1.7 PyOpenSSL-25.0.0 acme-3.1.0 certbot-3.1.0
certbot-apache-3.1.0 certifi-2025.1.31 cffi-1.17.1
charset-normalizer-3.4.1 configobj-5.0.9 cryptogr
We then create the following links
ln -s
/opt/certbot/bin/certbot /usr/bin/certbot
ln -s
/usr/local/apache2/bin/httpd /usr/local/sbin
ln -s
/usr/local/apache2/bin/apachectl /usr/local/bin
I created the
directory /etc/httpd/conf.d
Before going further the Apache configuration file httpd.conf must be configured so that there is a virtual host on port 80 with the address visible to the internet.
<VirtualHost
192.168.13.11:80>
ServerName
personaladdress.ddns.net
DocumentRoot
/usr/local/apache2/htdocs
ErrorLog
logs/ddns-error_log
TransferLog
logs/ddns-access_log
</VirtualHost>
Then we type
certbot --apache
--apache-server-root /usr/local/apache2
Here is the result
Enter email address (used for urgent renewal and security notices)
(Enter 'c' to cancel): olivier.hoarau@funix.org
- - - - - - - - - - - - - - - - - - - - - - - - - - - - - - - - - - - - - - - -
Please read the Terms of Service at
https://letsencrypt.org/documents/LE-SA-v1.4-April-3-2024.pdf. You must agree in
order to register with the ACME server. Do you agree?
- - - - - - - - - - - - - - - - - - - - - - - - - - - - - - - - - - - - - - - -
(Y)es/(N)o: Y
- - - - - - - - - - - - - - - - - - - - - - - - - - - - - - - - - - - - - - - -
Would you be willing, once your first certificate is successfully issued, to
share your email address with the Electronic Frontier Foundation, a founding
partner of the Let's Encrypt project and the non-profit organization that
develops Certbot? We'd like to send you email about our work encrypting the web,
EFF news, campaigns, and ways to support digital freedom.
- - - - - - - - - - - - - - - - - - - - - - - - - - - - - - - - - - - - - - - -
(Y)es/(N)o: N
Account registered.
Which names would you like to activate HTTPS for?
We recommend selecting either all domains, or all domains in a VirtualHost/server block.
- - - - - - - - - - - - - - - - - - - - - - - - - - - - - - - - - - - - - - - -
1: adresseperso.ddns.net
2: funix-mana.kervao.fr
3: hoarau-mana.kervao.fr
4: sql-mana.kervao.fr
5: mana.kervao.fr
- - - - - - - - - - - - - - - - - - - - - - - - - - - - - - - - - - - - - - - -
Select the appropriate numbers separated by commas and/or spaces, or leave input
blank to select all options shown (Enter 'c' to cancel): 1
Requesting a certificate for adresseperso.ddns.net
Successfully received certificate.
Certificate is saved at: /etc/letsencrypt/live/adresseperso.ddns.net/fullchain.pem
Key is saved at: /etc/letsencrypt/live/adresseperso.ddns.net/privkey.pem
This certificate expires on 2025-05-09.
These files will be updated when the certificate renews.
Deploying certificate
Successfully deployed certificate for adresseperso.ddns.net to /usr/local/apache2/conf/httpd-le-ssl.conf
Congratulations! You have successfully enabled HTTPS on https://adresseperso.ddns.net
NEXT STEPS:
- The certificate will need to be renewed before it expires. Certbot can automatically renew the certificate in the background, but you may need to take steps to enable that functional
ity. See https://certbot.org/renewal-setup for instructions.
- - - - - - - - - - - - - - - - - - - - - - - - - - - - - - - - - - - - - - - -
If you like Certbot, please consider supporting our work by:
* Donating to ISRG / Let's Encrypt: https://letsencrypt.org/donate
* Donating to EFF: https://eff.org/donate-le
- - - - - - - - - - - - - - - - - - - - - - - - - - - - - - - - - - - - - - - -
It will create the file /usr/local/apache2/conf/httpd-le-ssl.conf which will contain
<IfModule mod_ssl.c>
<VirtualHost
192.168.13.11:443>
ServerName
personaladdress.ddns.net
DocumentRoot
/usr/local/apache2/htdocs
ErrorLog
logs/ddns-error_log
TransferLog
logs/ddns-access_log
SSLCertificateFile
/etc/letsencrypt/live/addressperso.ddns.net/fullchain.pem
SSLCertificateKeyFile
/etc/letsencrypt/live/addressperso.ddns.net/privkey.pem
Include
/etc/letsencrypt/options-ssl-apache.conf
</VirtualHost>
</IfModule>
and it will modify the file /usr/local/apache2/conf/httpd.conf which will contain
LoadModule ssl_module modules/mod_ssl.so
(...)
# Secure (SSL/TLS)
connections
Include
conf/extra/httpd-ssl.conf
#
# Note: The following must
must be present to support
# starting without SSL on
platforms with no /dev/random equivalent
# but a statically
compiled-in mod_ssl.
#
<IfModule
ssl_module>
SSLRandomSeed startup
builtin
SSLRandomSeed connect
builtin
</IfModule>
(...)
<VirtualHost
192.168.13.11:80>
ServerName
personaladdress.ddns.net
DocumentRoot
/usr/local/apache2/htdocs
ErrorLog
logs/ddns-error_log
TransferLog
logs/ddns-access_log
RewriteEngine on
RewriteCond %{SERVER_NAME}
=personaladdress.ddns.net
RewriteRule ^
https://%{SERVER_NAME}%{REQUEST_URI} [END,NE,R=permanent]
</VirtualHost>
(...)
Include /usr/local/apache2/conf/httpd-le-ssl.conf
The conf/extra/httpd-ssl.conf file is given above .
All let's encrypt configuration files are under /etc/letsencrypt , certificates are under /etc/letsencrypt/live/persoaddress.ddns.net. Now the certificate has a limited lifetime and it
is possible to renew it automatically, everything is indicated
here. Just type the
following command as root in a terminal
SLEEPTIME=$(awk 'BEGIN{srand(); print int(rand()*(3600+1))}'); echo "0 0.12 * * * root sleep $SLEEPTIME && certbot renew -q" | sudo tee -a /etc/crontab > /dev/null
Here is the content of my /etc/crontab file
SHELL=/bin/bash
PATH=/sbin:/bin:/usr/sbin:/usr/bin
MAILTO=root
HOME=/
# run-parts
01 * * * * root nice -n 19
run-parts --report /etc/cron.hourly
02 4 * * * root nice -n 19
run-parts --report /etc/cron.daily
22 4 * * 0 root nice -n 19
run-parts --report /etc/cron.weekly
42 4 1 * * root nice -n 19
run-parts --report /etc/cron.monthly
0 0.12 * * * root sleep
2501 && certbot renew -q
We restart crond with the command systemctl restart crond
Please note that it is important to check that cerbot is up to date. To do this, type the following command at least every month
/opt/certbot/bin/pip install --upgrade certbot certbot-apache
here is the result (extract)
Requirement already
satisfied: certbot in
/opt/certbot/lib/python3.10/site-packages (3.1.0)
Requirement already
satisfied: certbot-apache in
/opt/certbot/lib/python3.10/site-packages (3.1.0)
Requirement already
satisfied: acme>=3.1.0 in
/opt/certbot/lib/python3.10/site-packages (from certbot)
(3.1.0)
Requirement already
satisfied: ConfigArgParse>=1.5.3 in
/opt/certbot/lib/python3.10/site-packages (from certbot)
(1.7)
(...)
Requirement already
satisfied: typing-extensions>=4.9 in
/opt/certbot/lib/python3.10/site-packages (from
PyOpenSSL!=23.1.0,>=17.5.0->acme>=3.1.0->certbot)
(4.12.2)
Requirement already
satisfied: charset-normalizer<4,>=2 in
/opt/certbot/lib/python3.10/site-packages (from
requests>=2.20.0->acme>=3.1.0->certbot) (3.4.1)
Requirement already
satisfied: idna<4,>=2.5 in
/opt/certbot/lib/python3.10/site-packages (from
requests>=2.20.0->acme>=3.1.0->certbot) (3.10)
Requirement already
satisfied: urllib3<3,>=1.21.1 in
/opt/certbot/lib/python3.10/site-packages (from
requests>=2.20.0->acme>=3.1.0->certbot) (2.3.0)
Requirement already
satisfied: certifi>=2017.4.17 in
/opt/certbot/lib/python3.10/site-packages (from
requests>=2.20.0->acme>=3.1.0->certbot)
(2025.1.31)
The easiest way is to create
the file /etc/cron.monthly/certbot-update which will contain
#!/bin/bash
/opt/certbot/bin/pip
install --upgrade certbot certbot-apache
CGI scripts
CGI scripts are generally not enabled by default, in the httpd.conf file you will probably have to uncomment the linesLoadModule cgid_module modules/mod_cgid.so
AddHandler cgi-script .cgi .pl
I added the .pl extension for scripts written in perl .
In particular, we find the line that indicates where to find the scripts:
ScriptAlias /cgi-bin/ /usr/local/apache2/cgi-bin/
To have CGI scripts executed in directories accessible via HTTP, you will need to add the ExecCGI option like this
<Directory
"/monrepertoire">
Options
Indexes FollowSymLinks Includes ExecCGI
AllowOverride
All
Require all
granted
</Directory>
we of course restart apache in case of modification of the httpd.conf file
The goal of the exercise is to create a perl CGI script that will process any form on an HTML page. You will create your perl script under /usr/local/apache2/cgi-bin, and name it form.pl , here is its content:
#!/usr/bin/perl
use CGI;
$html=new CGI;
print $html->header;
print "<HTML>\n";
print "<HEAD>\n";
print "<TITLE>First
CGI perl script</TITLE>\n";
print "</HEAD>\n";
print "<BODY>\n";
print "<H1>Form
processing</H1>\n";
print "Name:";
print
$html->param('name');
print "<p>\n";
print "Email:";
print
$html->param('email');
print "<p>\n";
print "Comment:";
print
$html->param('comment');
print "</BODY>\n";
print "</HTML>\n";
Grant the appropriate permissions to this file:
chmod 755 form.pl
As a standard user ( olivier in our example), now create the following HTML file that you will call form.htm
<html>
<body>
<h2>Form</h2>
<form
action="http://obelix/cgi-bin/form.pl" METHOD=GET>
Name: <input type="text"
name=nom size=20><br>
Email: <input
type="text" name=email size=30><br>
Comment: <input
type="text" name=comment size=100><br>
<input type=submit
value="Submit"> <input type=reset value="reset">
</form>
</body>
</html>
Now when you go to http://obelix/~olivier/formulaire.htm , you will have a page like this:
Pressing Send will trigger the execution of the perl CGI script, which will cause the previously entered values to be displayed.
PHP and LDAP
We can compile PHP to be able to use commands managing an LDAP database , for this when compiling PHP we will add the following option to the configure options :--with-ldap=/var/lib/ldap
/var/lib/ldap should be replaced with the path where your LDAP database is located . Recompile and reinstall the correct module:
make
And as root
make install
Restart Apache
systemctl restart httpd
Here is a small program that will allow us to add an entry to the database. You are now free to create entry, destruction and search forms:
Call this file ldap.php , you can test it and verify that the entry has been entered into the database.
Database Management with MariaDB
Operational tests with MariaDB
<?php
$server="localhost";
$login="olivier";
$pass="password";
$base="trial";
$table="coord";
$id=MYSQL_CONNECT($server,$login,$pass);
mysql_select_db($base);
$name="hoarau";
$firstname="olivier";
$email="olivier.hoarau@fnac.net";
$query="INSERT INTO $table
VALUES('$name','$firstname','$email')";
$result=mysql_query($query,$id);
echo "Entry completed";
?>
Place this script in ~/public_html and call it bd1.php
In your favorite browser, in the URL field enter:
http://obelix/~olivier/bd1.php
A priori nothing much happened, now connect to your test base in a shell
mariadb -u olivier -p test
Enter password:
Welcome to the MariaDB
monitor. Commands end with ; or \g.
Your MariaDB connection id
is 91
Server version:
11.4.2-MariaDB Source distribution
Copyright (c) 2000, 2018,
Oracle, MariaDB Corporation Ab and others.
Type 'help;' or '\h' for
help. Type '\c' to clear the current input statement.
MariaDB [(test)]> SELECT
* FROM coord;
+-----+-------+--------------------+
| name | firstname | email
|
+-----+-------+--------------------+
| hoarau | olivier |
olivier.hoarau@fnac.net |
+-----+-------+--------------------+
1 row in set (0.00 sec)
That's good, it works. Let's move on to a more specific example, we will enter the information about your visitors into a MySQL database , create the table as described in example 2 of the MariaDB page , now create the PHP script .
<?php
$page=getenv("HTTP_REFERER");
$ip=getenv("REMOTE_ADDR");
$host=gethostbyaddr($ip);
$d = date("d/m/YH:i:s");
$expl=getenv("HTTP_USER_AGENT");
$server="localhost";
$login="olivier";
$pass="password";
$base="trial";
$table="ref";
$id=MYSQL_CONNECT($server,$login,$pass);
mysql_select_db($base);
$query="INSERT INTO $table
VALUES('$d','$host','$ip','$expl','$page')";
$result=mysql_query($query,$id);
echo "$d $host($ip) $expl $page";
?>
Name this script bd2.php and place it in ~/public_html. In your favorite browser type in the URL field
http://obelix/~olivier/bd2.php
You should see the date, the name of your machine with its IP address and information about your OS and browser. Now let's connect to the database:
mariadb -u olivier -p test
Enter password:
Welcome to
the MariaDB monitor. Commands end with ; or \g.
Your MariaDB connection
id is 91
Server version:
11.4.2-MariaDB Source distribution
Copyright (c) 2000,
2018, Oracle, MariaDB Corporation Ab and others.
Type 'help;' or '\h' for help. Type '\c' to clear the current input statement.
MariaDB [(try)] > SELECT * FROM ref;
+---------------+---------------+---------+-----------------+-----+
| date | host | ip | bones
| page |
+---------------+---------------+---------+-----------------+-----+
| 04/24/2000 08:34:05 |
asterix.armoric.bz | 192.168.13.11 | Mozilla/4.61 [en] (X |
|
+---------------+---------------+----------+-----------------+-----+
1 row in set (0.00 sec)
It's good, the visitor has been taken into account.
Now that you know how Apache works with MariaDB and PHP , let your imagination run wild.
MySQL database administration with phpMyAdmin
- edit, add or delete fields,
- type SQL commands,
- manage field keys,
- ...
The archive comes in the form of a zip file that you unzip by typing:
unzip phpMyAdmin-5.2.2-all-languages.zip
This will create a directory in the working directory phpMyAdmin-5.2.2-all-languages . In this directory you have a file config.inc.sample.php , you have to copy it to config.inc.php , in this file you have to modify the following fields:
For this variable you can put anything as long as it's 32 bytes! By putting a line of 32 characters it seems to work, it's then used to encrypt randomly.
$cfg['blowfish_secret'] = 'i am toto and the sentence must be long enough'; /* YOU MUST FILL IN THIS FOR COOKIE AUTH ! */
I also defined this variable
$cfg['DefaultLang'] = 'en';
for the rest I left the default values namely
Now we need to make the phpMyAdmin directory of a web page accessible, for this there
are two solutions:
- (simple solution) place phpMyAdmin in /usr/local/apache/htdocs and at the level of the apache home page make a
link to /usr/local/apache/htdocs/phpMyAdmin-5.2-all-languages/index.php
- (recommended solution), create a virtual host
pointing to ./phpMyAdmin-5.2.2-all-languageswhich we will call www.sql.breizland.bz .
If you have the error
mysqli_real_connect(): (HY000/2002): No such file or directory
in the configuration file you will have to replace localhost with 127.0.01 like this
$cfg['Servers'][$i]['host'] = '127.0.0.1';
if you now have the error
$cfg['TempDir'] (./tmp/) is not accessible. phpMyAdmin is unable to cache templates and will therefore be slow.
in the config.inc.php file you will need to define the variable
$cfg['TempDir'] = '/tmp';
For this error
Create a database named “phpmyadmin” and configure phpMyAdmin storage in this database.
in the configuration file config.inc.php we will uncomment the following lines
/* Storage database and
tables */
$cfg['Servers'][$i]['pmadb'] = 'phpmyadmin';
$cfg['Servers'][$i]['bookmarktable'] = 'pma__bookmark';
$cfg['Servers'][$i]['relation'] = 'pma__relation';
$cfg['Servers'][$i]['table_info'] = 'pma__table_info';
$cfg['Servers'][$i]['table_coords'] = 'pma__table_coords';
$cfg['Servers'][$i]['pdf_pages'] = 'pma__pdf_pages';
$cfg['Servers'][$i]['column_info'] = 'pma__column_info';
$cfg['Servers'][$i]['history'] = 'pma__history';
$cfg['Servers'][$i]['table_uiprefs'] = 'pma__table_uiprefs';
$cfg['Servers'][$i]['tracking'] = 'pma__tracking';
$cfg['Servers'][$i]['userconfig'] = 'pma__userconfig';
$cfg['Servers'][$i]['recent'] = 'pma__recent';
$cfg['Servers'][$i]['favorite'] = 'pma__favorite';
$cfg['Servers'][$i]['users'] = 'pma__users';
$cfg['Servers'][$i]['usergroups'] = 'pma__usergroups';
$cfg['Servers'][$i]['navigationhiding'] =
'pma__navigationhiding';
$cfg['Servers'][$i]['savedsearches'] = 'pma__savedsearches';
$cfg['Servers'][$i]['central_columns'] =
'pma__central_columns';
$cfg['Servers'][$i]['designer_settings'] =
'pma__designer_settings';
$cfg['Servers'][$i]['export_templates'] =
'pma__export_templates';
In the SQL console at the bottom of the screen we will create the phpmyadmin database
CREATE DATABASE IF NOT
EXISTS `phpmyadmin`
DEFAULT CHARACTER
SET utf8 COLLATE utf8_bin;
USE phpmyadmin;
CTRL+enter to execute
We select the phpmyadmin base on the left and still in the console we will create the tables by importing the file phpMyAdmin-5.2.2-all-languages /sql/create_tables.sql
NOTE If you are concerned that anyone from a browser can go into the phpMyAdmin directory , put access restrictions there with a .htaccess file .
With the virtual host solution, from a browser when you select www.sql.breizland.bz you first come across a login banner, then a window with a frame with the list of available databases on the left and the following menu on the right:

To work on a particular database, simply select it from the drop-down menu on the left; we also find our test database ; to create another one, simply choose Databases then Create a database .
If we select test for example we get
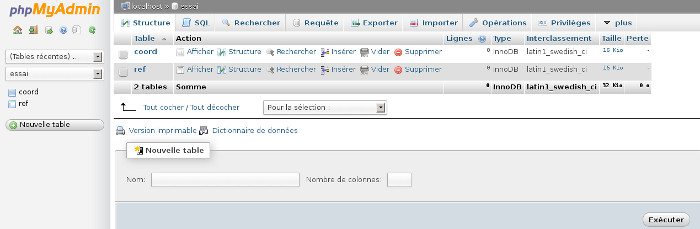
So you can create new tables, do SQL queries , etc.
Note that if you have a phpMyAdmin loading error like
Error during session start;
please check your PHP and/or webserver log file and
configure your PHP installation properly. Also ensure that
cookies are enabled in your browser.
session_start():
open(SESSION_FILE, O_RDWR) failed: No such file or directory
(2)
session_start(): Failed to
read session data: files (path: )
you will need to edit the file /usr/local/apache2/conf/php.ini and modify the following line
session.save_path = "/tmp"you put the temporary directory you want.
Secure connection between MariaDB server and phpMyAdmin
Now for a secure connection we will add in the config.inc.php file
$cfg['Servers'][$i]['ssl']
= true;
$cfg['Servers'][$i]['ssl_key']
='/etc/mysql/ssl/client-key.pem';
$cfg['Servers'][$i]['ssl_cert'] =
'/etc/mysql/ssl/client-cert.pem';
$cfg['Servers'][$i]['ssl_ca'] =
'/etc/mysql/ssl/ca-cert.pem';
$cfg['Servers'][$i]['ssl_ca_path'] = '/etc/mysql/ssl/';
$cfg['Servers'][$i]['ssl_verify'] = 'true';
$cfg['Servers'][$i]['ssl_ciphers'] =
'ECDHE-RSA-AES256-GCM-SHA384';
You will probably also need to add the server name as defined above
$cfg['Servers'][$i]['host'] = '127.0.0.1';$cfg['Servers'][$i]['host'] = 'mariadb-server';
This will avoid this kind of mistake.
mysqli::real_connect(): Peer certificate CN=`mariadb-serveur' did not match expected CN=`127.0.0.1'
and here is what happens when we connect, this is what it will look like in the MariaDB properties
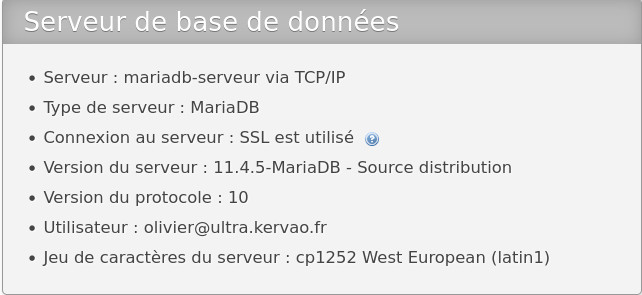
You will also have to avoid another trap with secure connections if your user is declared as user@localhost in the mysql database , you will not be able to connect with user@mariadb-serveur , you will have to create a new user user@mariadb-serveur .
| [ Back to FUNIX home page ] | [ back to top of page ] |