 Welcome
 Linux
Linux Unix
Unix Download
Encourage FUNIX
The consultation of the site is completely free and without advertisements. Donations are nevertheless appreciated to pay for hosting and encourage its author
Multimedia
Video editing
- The basics of video editing
- Installation of video editing software
- Editing your video with Kdenlive
- Editing your video with Cinelerra
- Editing your video with OpenShot Video Editor
- Editing your video with Pitivi Video Editor
- Editing your video with Flowblade Video Editor
- Editing your video with Shotcut
- Installation of video editing software
- Editing your video with Kdenlive
- Editing your video with Cinelerra
- Editing your video with OpenShot Video Editor
- Editing your video with Pitivi Video Editor
- Editing your video with Flowblade Video Editor
- Editing your video with Shotcut
Edit your video with kdenlive
Network and system
Email management
[ Presentation | Configuration | Importing rush files ( Video
acquisition , Classic
import ) | Editing | Transcoding ]
Quick Guide to Using Cinelerra
Last modified
January 1, 2014
This site has been automatically translated with Google Translate from this original page written in french, there may be some translation errors
This site has been automatically translated with Google Translate from this original page written in french, there may be some translation errors
Presentation
This page is a
quick guide to using Cinelerra , it will be assumed that you have already gone
through the basic video tools installation steps, the DV camcorder tools page and the editing page (for cinelerra , kdenlive and kino). It is assumed that all ieee1394 drivers are
loaded (ieee1395, raw1394, ohci1394 and dv1394).
The video tutorial version is below
The video tutorial version is below
Cinelerra Configuration
Now you can launch Cinelerra .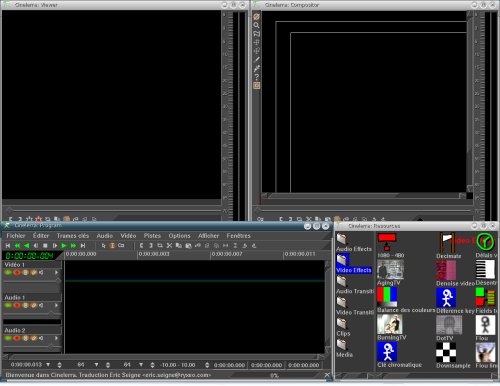
You can very
well close the additional windows and keep only the main
timeline window, you can reopen the other windows from the Windows menu . First of all, you should know that Cinelerra is still subject to some crashes, all its windows
suddenly disappear. Fortunately, Cinelerra saves your project by default each time you make a
change to it. So just after restarting Cinelerra , just click on File->Load
backup to find your
work. However, don't forget to save your work from the File menu ( Save ), you should know that when saving a project, Cinelerra only saves the information about the video and
audio files used in it, you must leave them where they are and
not move them until the project is definitively closed.
Now we will
configure cinelerra to set the output video format, this is where you
need to know the parameters of your input video, you obviously
cannot set an output frame rate higher than the input one. You
can access these parameters from the toolbar of the Configuration->Format...
window
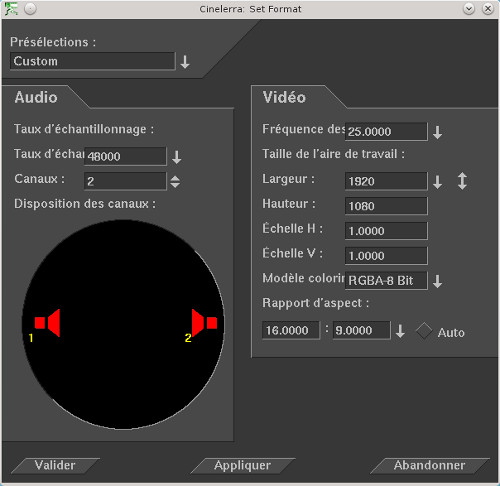
I chose the
default recording settings of my GoPro HD3 camera. Enter the
frequency, the image format or width and set a ratio of 4:3 or
16:9 if you want. You can leave the other settings as default.
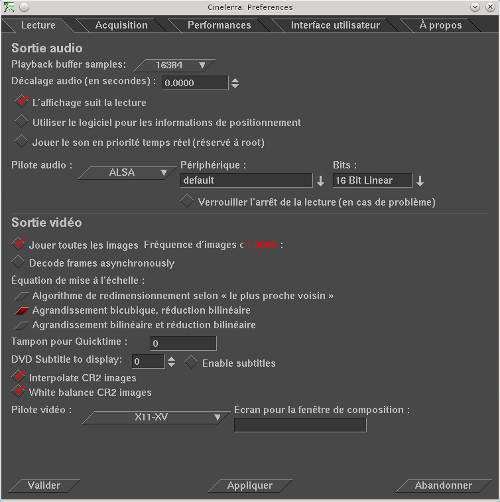
At the Configuration -> Preferences... level , you can define the audio parameters. You
must choose ALSA instead of OSS which is no longer used on recent Linux
configurations.
For IEEE recording parameters this gives this
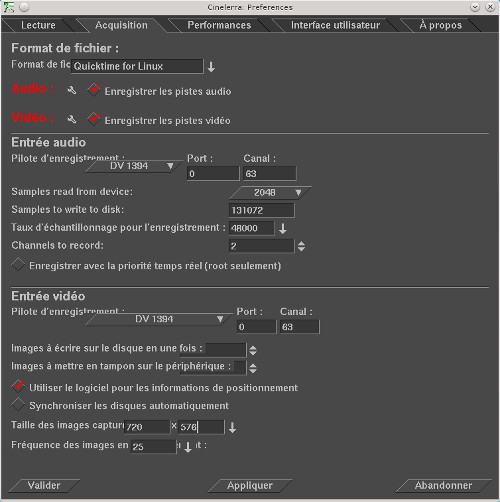
Note that I had to create the link /dev/dv1394 to /dev/ieee1394/dv/host0/PAL/in (see the IEEE1394 configuration page (dv1394 chapter) for more details).
[ back to top of page ]
Now remember to save your project Files -> Save .
Importing rush files
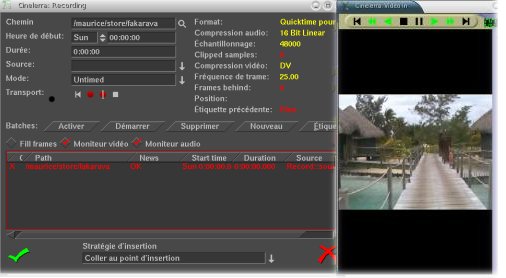
Acquisition by cinelerra
You have
to click on File->Acquisition , you get two windows
that control the recording. The one on the left allows you
to start the recording (red button), possibly by
programming it. The one on the right allows you to view
what you are recording in real time (to avoid losing
images in the case of a low-power machine, click on Video
monitor and/or Audio
monitor ).
When the
recording is finished (black square), at the Insert
Strategy level you can choose Replace
existing project to create a new project.
The different acquired scenes will appear automatically.
Now remember to save your project Files -> Save .
[ back to top of
page ]
Classic
import
To import files, you must choose the menu Files->Load Files
Classic
import
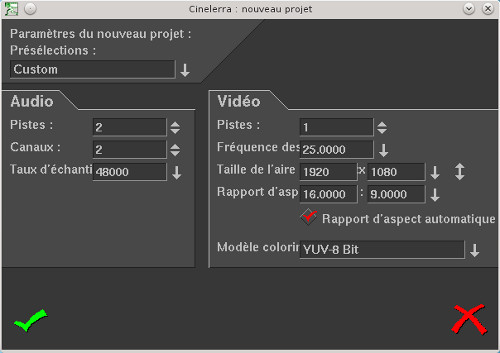
To create a project
from pre-recorded videos from a digital camera or any
camera, launch cinelerra and create a project
( File->New
Project... ). You can choose
the number of tracks, I put 1 by default, You can also
choose the format of the video (I chose that of the
GoPro HD3) to stay in HD.
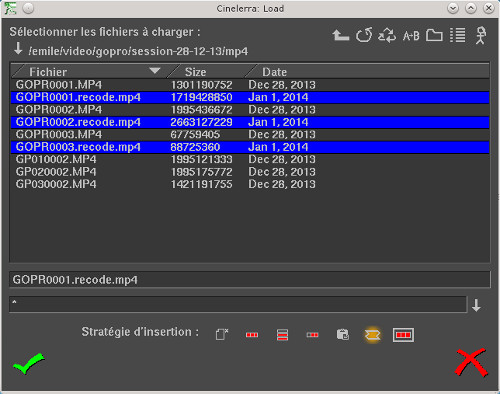
To import files, you must choose the menu Files->Load Files
you have the
choice between different import strategies
- Replace current project
- Replace current project and concatenate tracks
- Add to new tracks
- Concatenate to existing tracks
- Paste at insertion point
- Create new assets only
- Nest sequence
As the project is already created we will choose Create new assets only . At this stage remember to save your project.
TIP for gopro files in HD, I encountered huge problems of slowness when editing in the composition window (Compositor), to solve them I had to reprocess the files with this script
#!/bin/bash
for file in G*.MP4
do
base="${file%.*}"
ffmpeg -i $file -b 20M -s 1920x1080 -acodec libvo_aacenc $base.recode.mp4 &
done
We then import in the new format and we find the fluidity necessary to be able to edit.
Window -> Show Viewer
Window -> Show Resource Window
Windows -> Show Composition Window
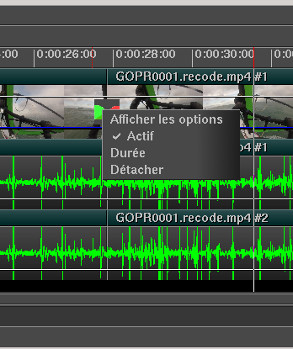
We choose the one that interests us (I took Crossfade ) and by drag and drop we move it in the main window between two scenes. The transition icon has appeared, when we right-click on it, the menu below appears:

Now it's time to add a title to the video. In the Video Effects folder of the Resources window, choose Title, drag and drop it to the beginning of the sequence in the main window.
A red band has appeared over the entire duration of the video, this means that the title will appear all the time, this is not really what we want, just select the red area (at the end of the strip) and reduce it with the mouse.
Now by clicking on the button that looks like a racket on the red banner of the Title effect you access its
properties, the property window is also accessible
via the right mouse button by targeting the red
Title banner, you bring up a menu, then click on Show options .
you access its
properties, the property window is also accessible
via the right mouse button by targeting the red
Title banner, you bring up a menu, then click on Show options .
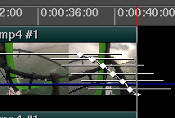
Now we will create a fade to black at the end of the video. Towards the last seconds of the video, click on the white line that runs through the entire video, a small white square appears, further on click again on the white line and move the square lower and so on. The series of small white squares materialize the points of passage (key frames) of the fade.
We will now add a soundtrack, we load an MP3 file and in the insertion strategy we choose Add to new Tracks , two audio tracks will be added. We mute the original audio tracks by clicking on the button of the two audio
tracks, we also click on the
of the two audio
tracks, we also click on the  Group settings button so that the
settings we are going to make on the added audio
tracks are not applied to the two original audio
tracks (the button must be in the configuration of
the previous screenshot). If the added audio tracks
are too long compared to the video track, select the
excess ( Cut-paste editing
mode ) and cut it ( Edit->Cut ). Now to make the
sound fade out at the end little by little, we will
use the key frames, on the added audio track at the
top we click 2 seconds before the end of the video
(you can adjust this value) on the white line that
follows the audio track, this creates a small white
square (key frame), we do the same at the end of the
track and we move the white square to the bottom, as
we left the Group settings button checked ,
this also applies to the second added audio track as
we can see below.
Group settings button so that the
settings we are going to make on the added audio
tracks are not applied to the two original audio
tracks (the button must be in the configuration of
the previous screenshot). If the added audio tracks
are too long compared to the video track, select the
excess ( Cut-paste editing
mode ) and cut it ( Edit->Cut ). Now to make the
sound fade out at the end little by little, we will
use the key frames, on the added audio track at the
top we click 2 seconds before the end of the video
(you can adjust this value) on the white line that
follows the audio track, this creates a small white
square (key frame), we do the same at the end of the
track and we move the white square to the bottom, as
we left the Group settings button checked ,
this also applies to the second added audio track as
we can see below.
Let's move on to
exporting, we open the rendering window by clicking
in the menu of the main window at Files->Rendering . This opens the
window below, we choose to export the video in Quicktime format
for Linux with an insertion
strategy without insertion into the project. Be
careful in the main window you must be placed at the
beginning of the timeline otherwise you risk having
only part of the project exported or nothing at all.
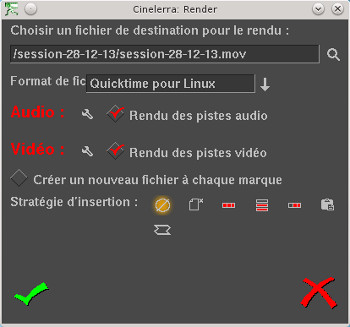
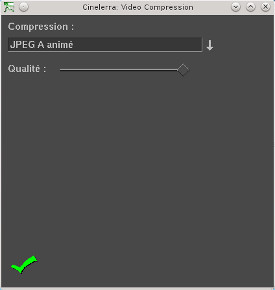
also I took animated JPEG-A for video options
You will notice
that during rendering, the video is played in
the composition window which tends to slow down
processing.
ffmpeg -i rendered-file.mov -ab 384k -ar 48000 -vb 8000k -vc libx264 -aspect 16:9 ReadyForYoutube.mp4
with the options:
- ab 384k: to set the audio bitrate (bit rate) to 320 kilobits per second
- ar 48000: to set the audio samplerate (sampling frequency) to 44100 Hz
- vb 8000k: to set the video bitrate to 8000 kilobits per second
- vc libx264: H264 codec based on the x264 library
- aspect 16:9: to set the aspect ratio of the image to 16:9
- Replace current project
- Replace current project and concatenate tracks
- Add to new tracks
- Concatenate to existing tracks
- Paste at insertion point
- Create new assets only
- Nest sequence
As the project is already created we will choose Create new assets only . At this stage remember to save your project.
TIP for gopro files in HD, I encountered huge problems of slowness when editing in the composition window (Compositor), to solve them I had to reprocess the files with this script
#!/bin/bash
for file in G*.MP4
do
base="${file%.*}"
ffmpeg -i $file -b 20M -s 1920x1080 -acodec libvo_aacenc $base.recode.mp4 &
done
We then import in the new format and we find the fluidity necessary to be able to edit.
Assembly
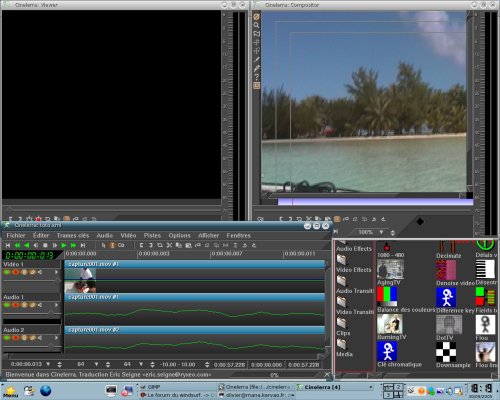
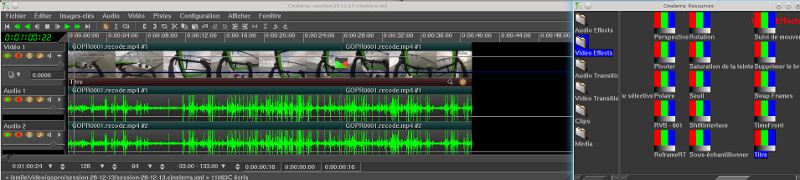
In case you have closed all windows other than the main window, open the Resources, Composition and Viewer windows.Window -> Show Viewer
Window -> Show Resource Window
Windows -> Show Composition Window
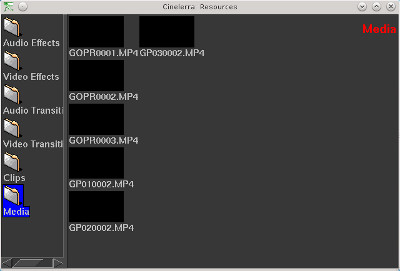
In the
screenshot above you will find the Resources
window where you can find all the resources of the
project, your raw video files in the Media folder, the
video transitions in another folder, etc. In the Media folder which is
selected by default, you will see your video files
that you have just loaded or acquired.
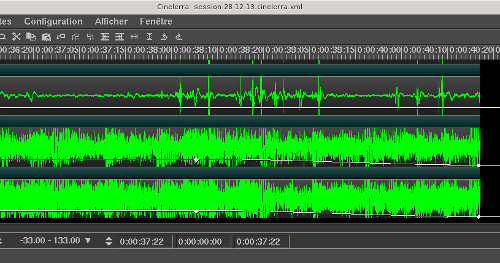
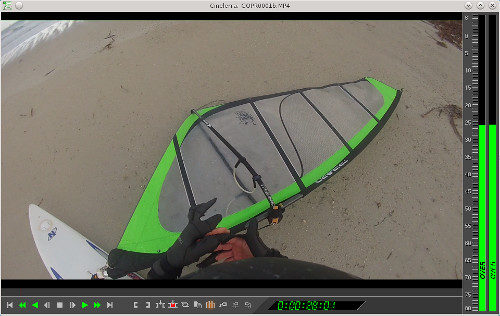
We will now start the actual editing by working on a first rush, we select it in the Media directory of the resources window and from the menu accessible by clicking on the right mouse button, we choose View , you then have the classic VCR controls to move around in the video (screenshot below).
 Now in this first
rush, we will extract the sequences that we like
and integrate them into the timeline. We move
through the video using the time cursor
Now in this first
rush, we will extract the sequences that we like
and integrate them into the timeline. We move
through the video using the time cursor  located between
the video and the controls at the bottom of the
window. We will use the brackets
located between
the video and the controls at the bottom of the
window. We will use the brackets  to select the
sequence of the video that interests us, the
opening bracket marks the beginning of the
sequence and the closing bracket the end of the
sequence, this is what it looks like at the
timeline level of the composition window
to select the
sequence of the video that interests us, the
opening bracket marks the beginning of the
sequence and the closing bracket the end of the
sequence, this is what it looks like at the
timeline level of the composition window  (the closing
bracket is red because the time cursor is confused
with it).
(the closing
bracket is red because the time cursor is confused
with it).
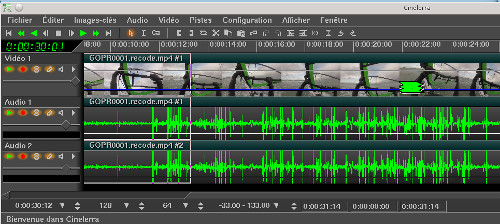
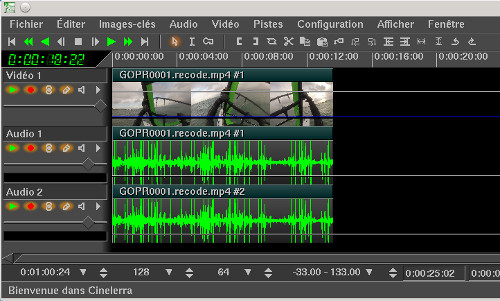
We return to the main window and place ourselves on the timeline at the desired insertion location (initially at the beginning of the timeline). We return to the viewing window, place the cursor between the bracket and click on the Insert button . We will find
the chosen sequence at the timeline level on the
first track with a video track and two audio
tracks (which correspond to stereo).
. We will find
the chosen sequence at the timeline level on the
first track with a video track and two audio
tracks (which correspond to stereo).
We will now start the actual editing by working on a first rush, we select it in the Media directory of the resources window and from the menu accessible by clicking on the right mouse button, we choose View , you then have the classic VCR controls to move around in the video (screenshot below).
located between
the video and the controls at the bottom of the
window. We will use the brackets to select the
sequence of the video that interests us, the
opening bracket marks the beginning of the
sequence and the closing bracket the end of the
sequence, this is what it looks like at the
timeline level of the composition window (the closing
bracket is red because the time cursor is confused
with it). We return to the main window and place ourselves on the timeline at the desired insertion location (initially at the beginning of the timeline). We return to the viewing window, place the cursor between the bracket and click on the Insert button
. We will find
the chosen sequence at the timeline level on the
first track with a video track and two audio
tracks (which correspond to stereo). The
visualization of the sequences of the timeline
is done in the composition window with
playback controls accessible from the main
window or the composition window. To see the
entire video in the composition window, you
will have to put the zoom selector on Auto
 .
.
We continue to select the interesting sequences in the visualization window, before inserting make sure that the cursor of the timeline of the main window is at the end of the track so that the new sequences are inserted after. To see all the scenes inserted in the timeline, click on the icon Adapt the selection to the display . If you
want to zoom in on the timeline, you have to
click on the Shift key then play with the
mouse scroll in one direction, we zoom out by
doing the same but scrolling in the other
direction.
. If you
want to zoom in on the timeline, you have to
click on the Shift key then play with the
mouse scroll in one direction, we zoom out by
doing the same but scrolling in the other
direction.
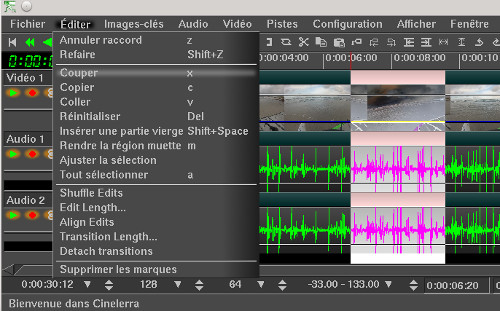
To delete some more unwanted parts in this selection, in the main window we will choose the Edit mode by copy and paste . Simply
select the offending part then in the menu Edit->Cut
. Simply
select the offending part then in the menu Edit->Cut
. We continue to select the interesting sequences in the visualization window, before inserting make sure that the cursor of the timeline of the main window is at the end of the track so that the new sequences are inserted after. To see all the scenes inserted in the timeline, click on the icon Adapt the selection to the display
. If you
want to zoom in on the timeline, you have to
click on the Shift key then play with the
mouse scroll in one direction, we zoom out by
doing the same but scrolling in the other
direction. To delete some more unwanted parts in this selection, in the main window we will choose the Edit mode by copy and paste
. Simply
select the offending part then in the menu Edit->Cut The space left
empty by the cut part is automatically occupied by
the sequences on the right of the timeline. In the
same way you can paste at the place where the
cursor is with the Edit->Paste menu . Now that
we only have the scenes that interest us, we can
now arrange them in the order we like. We go into
the Edit mode by
drag and drop  in the program
window, we grab the scene then by drag and drop,
we can put it after (or before) another.
in the program
window, we grab the scene then by drag and drop,
we can put it after (or before) another.
in the program
window, we grab the scene then by drag and drop,
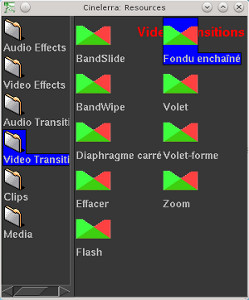
we can put it after (or before) another. Now you know how
to import video rush files, select the interesting
sequences and reassemble them as you wish on a
track of the timeline. We can move on to the
transition between two scenes. In the Resources
window, you have a Video
Transitions folder
which contains a number of transitions.
We choose the one that interests us (I took Crossfade ) and by drag and drop we move it in the main window between two scenes. The transition icon has appeared, when we right-click on it, the menu below appears:
You have to
click on Duration to indicate in
seconds the length of the transition. By clicking
on Detach it will have the
effect of deleting the transition. Now you can
visualize your work by clicking on the play button
of the main window, the result appears in the
composition window.
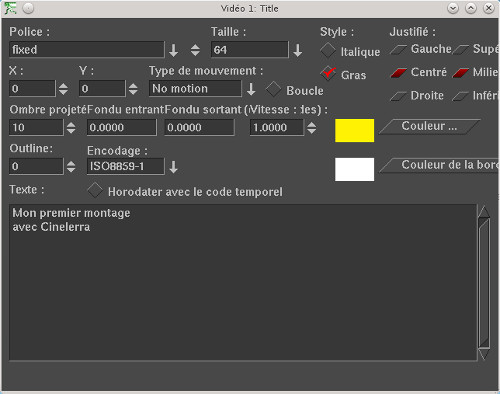
Now it's time to add a title to the video. In the Video Effects folder of the Resources window, choose Title, drag and drop it to the beginning of the sequence in the main window.
A red band has appeared over the entire duration of the video, this means that the title will appear all the time, this is not really what we want, just select the red area (at the end of the strip) and reduce it with the mouse.
Now by clicking on the button that looks like a racket on the red banner of the Title effect
you access its
properties, the property window is also accessible
via the right mouse button by targeting the red
Title banner, you bring up a menu, then click on Show options .Now we will create a fade to black at the end of the video. Towards the last seconds of the video, click on the white line that runs through the entire video, a small white square appears, further on click again on the white line and move the square lower and so on. The series of small white squares materialize the points of passage (key frames) of the fade.
We will now add a soundtrack, we load an MP3 file and in the insertion strategy we choose Add to new Tracks , two audio tracks will be added. We mute the original audio tracks by clicking on the button
of the two audio
tracks, we also click on the
Group settings button so that the
settings we are going to make on the added audio
tracks are not applied to the two original audio
tracks (the button must be in the configuration of
the previous screenshot). If the added audio tracks
are too long compared to the video track, select the
excess ( Cut-paste editing
mode ) and cut it ( Edit->Cut ). Now to make the
sound fade out at the end little by little, we will
use the key frames, on the added audio track at the
top we click 2 seconds before the end of the video
(you can adjust this value) on the white line that
follows the audio track, this creates a small white
square (key frame), we do the same at the end of the
track and we move the white square to the bottom, as
we left the Group settings button checked ,
this also applies to the second added audio track as
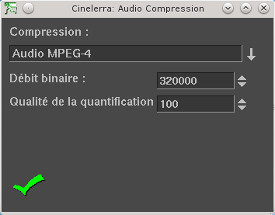
we can see below. There are
several export formats that have given me more
or less satisfaction, I choose a format with
maximum quality (and file size) that I will
reprocess later. In the meantime, in terms of
audio options (wrench button to the right of Audio ), I take Audio
MPEG-4
also I took animated JPEG-A for video options
Transcoding
According to the Youtube specification page , the command to type to generate a youtube compatible video from a raw video is:ffmpeg -i rendered-file.mov -ab 384k -ar 48000 -vb 8000k -vc libx264 -aspect 16:9 ReadyForYoutube.mp4
with the options:
- ab 384k: to set the audio bitrate (bit rate) to 320 kilobits per second
- ar 48000: to set the audio samplerate (sampling frequency) to 44100 Hz
- vb 8000k: to set the video bitrate to 8000 kilobits per second
- vc libx264: H264 codec based on the x264 library
- aspect 16:9: to set the aspect ratio of the image to 16:9
| [ Back to FUNIX home page ] |