 Welcome
 Linux
Linux Unix
Unix Download
Encourage FUNIX
Multimedia
Video editing
- Installation of video editing software
- Editing your video with Kdenlive
- Editing your video with Cinelerra
- Editing your video with OpenShot Video Editor
- Editing your video with Pitivi Video Editor
- Editing your video with Flowblade Video Editor
- Editing your video with Shotcut
Edit your video with kdenlive
Network and system
Email management
Last modified August 8, 2024
Mail reception and delivery (POP, IMAP and webmail)
This site has been automatically translated with Google Translate from this original page written in french, there may be some translation errors
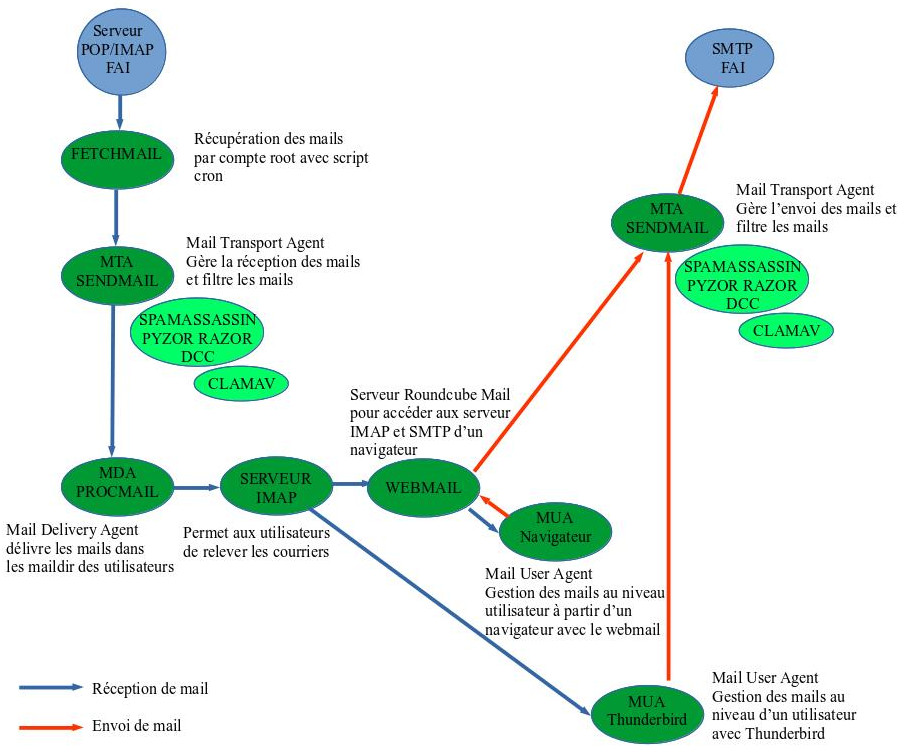
Configuration Overview
The purpose of this page is to show you how to retrieve emails from users of your network and make them available to them. The role of the different tools presented on this page is as follows:
- fetchmail allows you to retrieve emails from users of your network on several POP or IMAP servers accessible on the Internet- sendmail (MTA mail transport agent) allows you to locally manage the reception of emails and apply certain anti-spam and anti-virus filters
- procmail (MDA mail delivery agent) allows you to deliver emails and dispatch them according to the recipient, it can also apply other filters
- POP or IMAP servers make emails that have arrived accessible to mail readers (MUA Mail User Agent) on your network, whether your clients are on Windows or Unix.
- the webmail server allows you to manage emails via a browser, including from a mobile phone, in complete independence, that is to say by hosting your own server and email folders without depending on any Google that will have no qualms about consulting your emails. To do this, you will need to make your Apache server visible from the Internet, the whole point of the manipulation is to make only the Apache server accessible from the Internet , it is not necessary to open the POP, IMAP or SMTP server ports.
A small diagram is worth a thousand words, it looks something like this for receiving and sending emails.
Complementary to this page, also see the pages:
- anti-spam and anti-virus filtering- sendmail to manage the reception and sending of mail
Configuring mail reception
With fetchmail in root mode
For a multi-user version, you have the possibility to tell it to go and retrieve every hour by adding the recupmail script in the /etc/cron.hourly/ directory. Here is its content
#bin/bash
/usr/bin/fetchmail -a -f
/root/.fetchmailrc -L /var/log/fetchmail.log
echo "" >>
/var/log/fetchmail.log
ATTENTION commands launched in this file must be indicated with their full path. The file /var/log/fetchmail.log must first be created with a touch .
Now root must create a .fetchmailrc file which must be located in his home directory with permissions 600 ( chmod 600 ~/.fetchmailrc ). This file contains the following lines:
set logfile /var/log/fetchmail.log
poll pop.fai.fr protocol
pop3
user login-fai there
with password password-fai is olivier here
poll pop.fnac.net protocol
pop3
user login-fnac there
with password password-fnac is olivier here
poll pop.free.fr protocol
pop3
user login-free there
with password password-free is olivier here
poll pop.ifrance.com
protocol pop3
user login-ifrance
there with password password-ifrance is olivier here
poll pop.fnac.net protocol
pop3
user login2-fnac
there with password password2-fnac is veronique here
poll pop.ifrance.com
protocol pop3
user login2-ifrance
there with password password2-ifrance is veronique here
poll pop.libertysurf.fr
protocol pop3
user login-liberty
there with password password-liberty is olivier here
The fetchmail file under /var/log is the log file, pop.fai.fr is the name of your provider's pop server. login-fai is the name of your login at your provider, password-fai is the password at the provider, olivier is the login of the corresponding local user. You add as many poll and user lines as you have pop accounts on the right and left, you will note that we can take advantage of this to collect the emails of other users on your network (in the example user of the private network veronique).
ATTENTION : passwords are marked in clear text (hence the file rights...).
Now if your ISP has set up a POP server with secure connection with TLS/SSL we will add the appropriate option like this
poll pop.libertysurf.fr
protocol pop3
user login-liberty
there with password password-liberty is olivier here
option ssl;
you will then need to add the --sslcertck option to the fetchmail command like this
/usr/bin/fetchmail --sslcertck -a -f /root/.fetchmailrc -L /var/log/fetchmail.log
poll pop.libertysurf.fr
protocol pop3
user login-liberty
there with password password-liberty is olivier here
mda
"/usr/bin/procmail -d %T"
Note: On the other hand, the consequence of having put mda "/usr/bin/procmail -d %T" is that we no longer go through the local smtp server (by sendmail in my case) and if you had set up a whole anti-spam apparatus with spamassassin in particular, it will not be used, it is annoying. In this case we will add the following lines to the .procmailrc file to indicate that we want to launch spamc which will invoke the spamd daemon for verification.
:0fw
| /usr/local/bin/spamc
With fetchmail in daemon mode
The problem with using fetchmail to retrieve mail from multiple local accounts and getting this error
/etc/cron.hourly/recupmail:
fetchmail: Warning:
Calling fetchmail with root privileges is not recommended.
We will therefore use it in more secure daemon mode, we will need to install the fetchmail-daemon package which will install the file /usr/lib/systemd/system/fetchmail.service which contains:
[Unit]
Description=A
remote-mail retrieval utility
After=local-fs.target
network.target
[Service]
User=mail
EnvironmentFile=-/etc/sysconfig/fetchmail
ExecStart=/usr/bin/fetchmail -d ${FETCHMAIL_POLL} --syslog
-f /etc/fetchmailrc
RestartSec=1
[Install]
WantedBy=multi-user.target
By default logs will be archived by systemd and visible with journalctl
The /etc/sysconfig/fetchmail file contains
# Customized settings for
fetchmail
# Define nice level for
fetchmail
SERVICE_RUN_NICE_LEVEL="+5"
# Define polling
interval in seconds
FETCHMAIL_POLL=1800
we can adapt the fetch interval, I set it to 30min (by default it is 5min) and now /etc/fetchmailrc contains an identical file (without the log setfile line), this file belongs to the mail user ( mail group ). Now we make the service active
systemctl enable
fetchmail.service
Created symlink
/etc/systemd/system/multi-user.target.wants/fetchmail.service
→ /usr/lib/systemd/system/fetchmail.service.
and we launch it by typing
systemctl start fetchmail
and to know its status we will type
systemctl status fetchmail
here is the result
● fetchmail.service - A remote-mail retrieval utility
Loaded: loaded
(/usr/lib/systemd/system/fetchmail.service; enabled; vendor
preset: disabled)
Active: active (running) since Sun
2021-09-12 10:50:27 CEST; 15s ago
Main PID: 61259 (fetchmail)
Tasks: 1 (limit: 4677)
Memory: 2.8M
CPU: 81ms
CGroup:
/system.slice/fetchmail.service
└─61259 /usr/bin/fetchmail -d 1800 --syslog -f
/etc/fetchmailrc
sept. 12 10:50:27 mana.kervao.fr systemd[1]: Started A
remote-mail retrieval utility.
sept. 12 10:50:28 mana.kervao.fr fetchmail[61259]: démarrage
de fetchmail 6.4.8 en tâche de fond
sept. 12 10:50:29 mana.kervao.fr fetchmail[61259]: 1 message
pour olivier.hoarau@funix.org dans pop.xxx.net (63018 octets).
sept. 12 10:50:39 mana.kervao.fr fetchmail[61259]: lecture du
message olivier.hoarau@funix.org@pop.xxx.net:1 parmi 1 (63018
octets) éliminé
sept. 12 10:50:40 mana.kervao.fr fetchmail[61259]: 3 messages
pour veronique.hoarau@funix.org dans pop.xxx.net (181971
octets).
we will think if necessary to delete the file /etc/cron.hourly/recupmail
Procmail configuration
In the case of a POP server
There is nothing special to set up, note that the emails are stored in mbox format, mbox is the historic UNIX format it consists roughly of putting all the emails in a folder in a single file.
In the case of an IMAP server
When using an IMAP server, emails must be stored in Maildir format and not mbox, with maildir each email is a file and each folder is a directory. In this case, each user will create a .procmailrc file containing
DEFAULT="$HOME/Maildir/"
ORGMAIL=$DEFAULT
LOGFILE="$HOME/procmail.log"
MAILDIR="$HOME/Maildir/"
VERBOSE=on
Filtering tips
Procmail allows you to sort the mail received by fetchmail . For this, any user with their .fetchmailrc must also have a .procmailrc in their home directory. If I take my example, I had a unique pop account with my provider fnac.net, my email address was olivier.hoarau@fnac.net, my local account is olivier, that of my tender and dear veronique.hoarau@fnac.net and local account veronique. If I want to send to Véronique all the mail whose Recipient (To) or Copy (Cc) fields contain the field veronique or Véronique or Veronique, here is the header of my .procmailrc
#olivier
:0 c
*^(To|Cc|Bcc):*(veronique|Veronique)
!veronique
My wife's will have this
face:
#veronique
:0 c
*^(To|Cc|Bcc):*(olivier|Olivier|funboard|Funboard)
!olivier
I am subscribed to a funboard list, it is the name of the list which appears in the list of the recipient or the recipient in copy, and not my name, hence the sorting criterion.
The ! locally forwards the mail to the correct recipient. You can also make a single file for each user who will have this face:
#redirect to veronique:0 c
*^(To|Cc|Bcc):*(veronique|Veronique)
!veronique
#redirect to olivier
:0 c
*^(To|Cc|Bcc):*(olivier|Olivier|funboard|Funboard)
!olivier
# other emails to unidentified recipients go to olivier, you can very well put /dev/null (trash) instead of !olivier
:0
*.*
!olivier
Note that the small c allows you to manage copies, in its absence if an email arrives with Véronique as recipient (To) and Olivier as copy (Cc), only the first in the list will receive the email (in this case Véronique in my example file), c allows Olivier to also receive the mail.
If you have a single email with a single email attached and you plan to use it for several people. You can ask your contacts to specify the recipient in the subject of the email and do a sorting similar to that seen previously by filtering on the Subject field of the email ( *^(Subject):*(veronique|Veronique) ).
Configuration du serveur POP
You need to install the dovecot package, here is the result
Generating a
2048 bit RSA private key
...................+++
.........................................+++
writing new
private key to '/etc/pki/tls/private/dovecot.pem'
-----
the previous message corresponds to the creation of keys for SSL the connections. The dovecot package contains the imap and pop3 server , for my part I use the latter. Here is my /etc/dovecot/dovecot.conf file by configuring a pop3 server
## Dovecot configuration file
# If you're in a hurry, see http://wiki2.dovecot.org/QuickConfiguration# "doveconf -n" command gives a clean output of the changed settings. Use it
# instead of copy&pasting files when posting to the Dovecot mailing list.
# '#' character and everything after it is treated as comments. Extra spaces
# and tabs are ignored. If you want to use either of these explicitly, put the
# value inside quotes, eg.: key = "# char and trailing whitespace "
# Most (but not all) settings can be overridden by different protocols and/or
# source/destination IPs by placing the settings inside sections, for example:
# protocol imap { }, local 127.0.0.1 { }, remote 10.0.0.0/8 { }
# Default values are shown for each setting, it's not required to uncomment
# those. These are exceptions to this though: No sections (e.g. namespace {})
# or plugin settings are added by default, they're listed only as examples.
# Paths are also just examples with the real defaults being based on configure
# options. The paths listed here are for configure --prefix=/usr
# --sysconfdir=/etc --localstatedir=/var
# Protocols we want to be serving.
#protocols = imap pop3 lmtp
protocols = pop3
# A comma separated list of IPs or hosts where to listen in for connections.
# "*" listens in all IPv4 interfaces, "::" listens in all IPv6 interfaces.
# If you want to specify non-default ports or anything more complex,
# edit conf.d/master.conf.
#listen = *, ::
listen = *
# Base directory where to store runtime data.
#base_dir = /var/run/dovecot/
# Name of this instance. In multi-instance setup doveadm and other commands
# can use -i <instance_name> to select which instance is used (an alternative
# to -c <config_path>). The instance name is also added to Dovecot processes
# in ps output.
#instance_name = dovecot
# Greeting message for clients.
#login_greeting = Dovecot ready.
# Space separated list of trusted network ranges. Connections from these
# IPs are allowed to override their IP addresses and ports (for logging and
# for authentication checks). disable_plaintext_auth is also ignored for
# these networks. Typically you'd specify your IMAP proxy servers here.
#login_trusted_networks =
# Space separated list of login access check sockets (e.g. tcpwrap)
#login_access_sockets =
# With proxy_maybe=yes if proxy destination matches any of these IPs, don't do
# proxying. This isn't necessary normally, but may be useful if the destination
# IP is e.g. a load balancer's IP.
#auth_proxy_self =
# Show more verbose process titles (in ps). Currently shows user name and
# IP address. Useful for seeing who are actually using the IMAP processes
# (eg. shared mailboxes or if same uid is used for multiple accounts).
#verbose_proctitle = no
# Should all processes be killed when Dovecot master process shuts down.
# Setting this to "no" means that Dovecot can be upgraded without
# forcing existing client connections to close (although that could also be
# a problem if the upgrade is e.g. because of a security fix).
#shutdown_clients = yes
# If non-zero, run mail commands via this many connections to doveadm server,
# instead of running them directly in the same process.
#doveadm_worker_count = 0
# UNIX socket or host:port used for connecting to doveadm server
#doveadm_socket_path = doveadm-server
# Space separated list of environment variables that are preserved on Dovecot
# startup and passed down to all of its child processes. You can also give
# key=value pairs to always set specific settings.
#import_environment = TZ
##
## Dictionary server settings
##
# Dictionary can be used to store key=value lists. This is used by several
# plugins. The dictionary can be accessed either directly or though a
# dictionary server. The following dict block maps dictionary names to URIs
# when the server is used. These can then be referenced using URIs in format
# "proxy::<name>".
dict {
#quota = mysql:/etc/dovecot/dovecot-dict-sql.conf.ext
#expire = sqlite:/etc/dovecot/dovecot-dict-sql.conf.ext
}
# Most of the actual configuration gets included below. The filenames are
# first sorted by their ASCII value and parsed in that order. The 00-prefixes
# in filenames are intended to make it easier to understand the ordering.
!include conf.d/*.conf
# A config file can also tried to be included without giving an error if
# it's not found:
!include_try local.conf
}
Now in the /etc/dovecot/conf.d directory there are two or three things to modify.
In the file 10-ssl.conf we specify that we use an SSL encrypted connection between the server and the client by putting
ssl = required
ssl_cert =
</etc/ssl/certs/dovecot.pem
ssl_key =
</etc/ssl/private/dovecot.pem
in the 10-auth.conf file we will put
disable_plaintext_auth = yesauth_mechanisms = plain
indeed as we use SSL we can use a clear text authentication mechanism. Now in the auth-system.conf.ext file we indicate that we use PAM
passdb {
driver = pam
# [session=yes]
[setcred=yes] [failure_show_msg=yes] [max_requests=<n>]
# [cache_key=<key>]
[<service name>]
#args = dovecot
}
userdb {
#
<doc/wiki/AuthDatabase.Passwd.txt>
driver = passwd
# [blocking=no]
#args =
# Override fields from
passwd
#override_fields =
home=/home/virtual/%u
}
now we relaunch dovecot
systemctl restart dovecot
normally we should have a message like this
Nov 24 16:23:42 mana.kervao.fr dovecot[27325]: master: Dovecot v2.2.13 starting up for imap, pop3 (core dumps disabled)
if you have the following errorOct. 10 10:49:26 mana.kervao.fr dovecot[19551]: pop3(olivier): Error: chown(/home/olivier/mail/.imap, group=12(mail)) failed: Operation not permitted (egid=5000(hoarau), group based on /var/mail/olivier - see http://wiki2.dovecot.org/Errors/ChgrpNoPerm)
Oct. 10 10:49:26 mana.kervao.fr dovecot[19551]: pop3(olivier): Error: Couldn't open INBOX: Permission denied
you will have to modify the mailbox rights like this /var/mail
chmod 0600 /var/mail/*
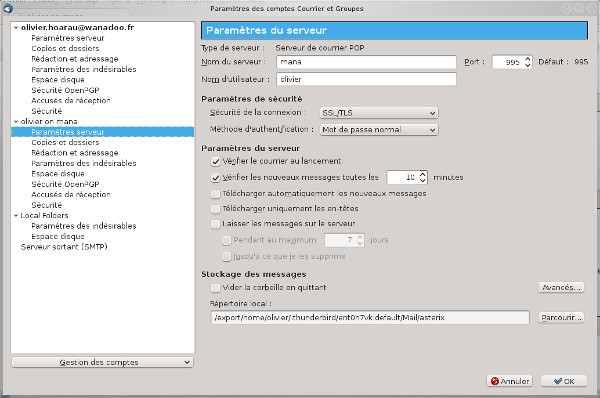
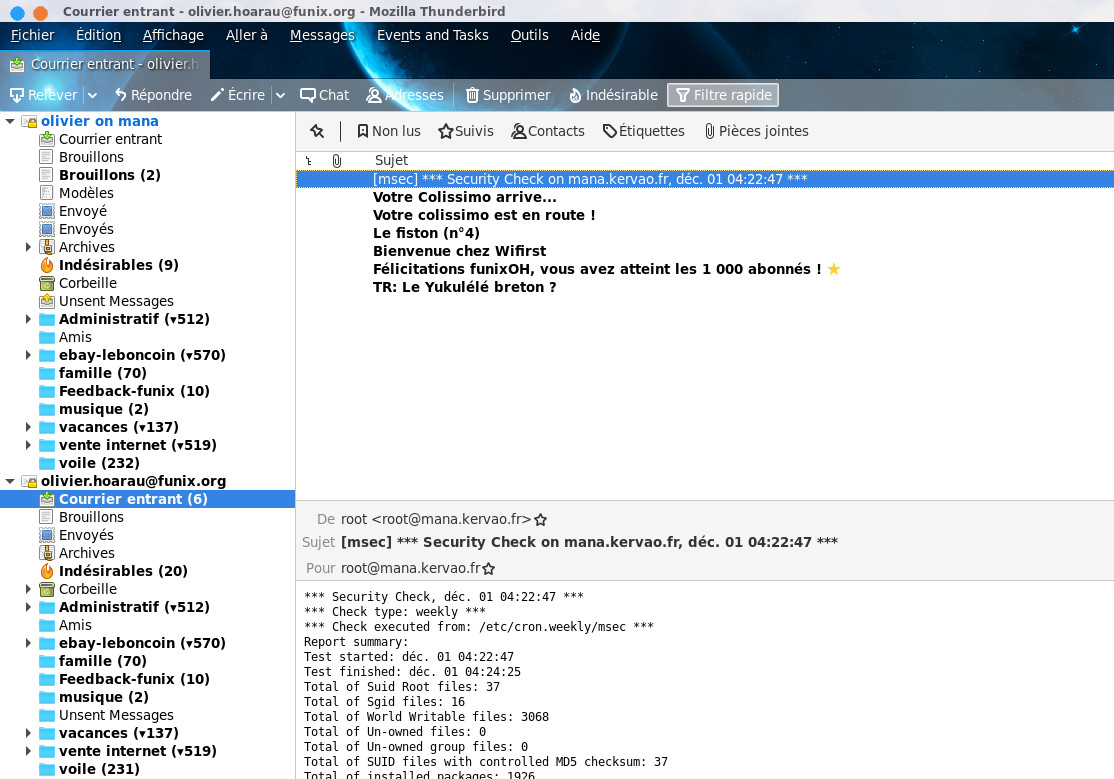
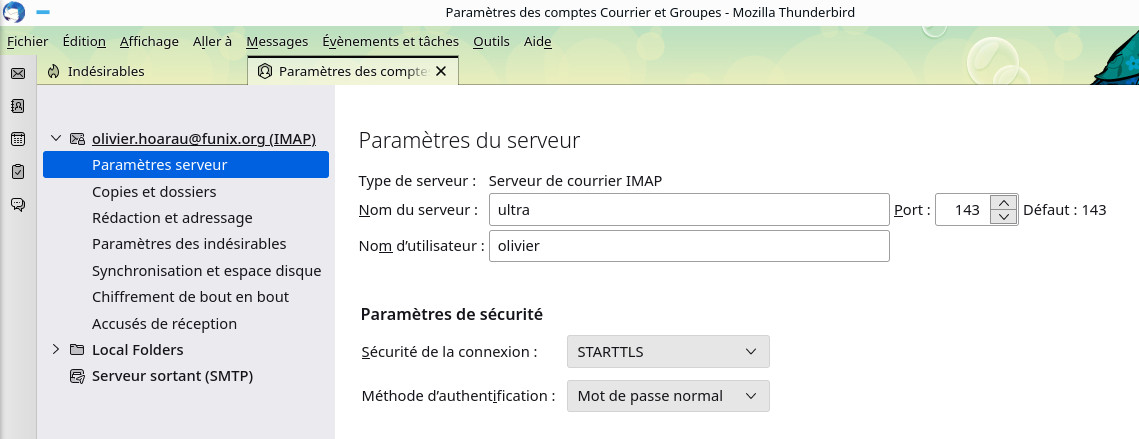
On the client side, configure your favorite mail software so that your Linux server is the POP server (just add the name of the workstation in question in the appropriate field), at the connection security level, indicate SSL/TLS. Example here with Thunderbird
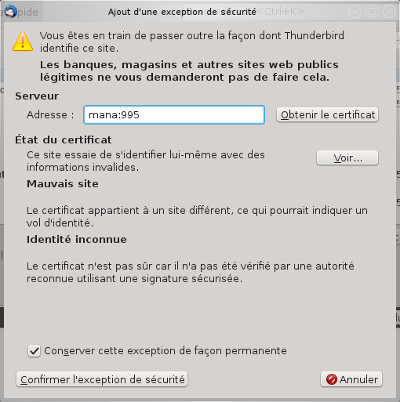
On first login you will probably need to confirm the security exception for your mail server
and that's it, the mails will be retrieved in /var/spool/mail of the server.
If ever one day your favorite
email client tells you that the server certificate is expired
and no longer valid, you will have to renew it. To do this, we
will start by saving the private key and the dovecot certificate by typing:
cp
/etc/ssl/private/dovecot.pem
/etc/ssl/private/dovecot.pem.old
cp
/etc/ssl/certs/dovecot.pem /etc/ssl/certs/dovecot.pem.old
we create a new private key
openssl
genrsa -out /etc/ssl/private/dovecot.pem 1024
here is the result
Generating
RSA private key, 1024 bit long modulus
..................++++++
.........++++++
e is 65537 (0x010001)
we create the new
certificate with a validity period of 2 years. It is obvious
that this certificate is personal and has no validity on the
internet, it will be useful for strictly private use.
openssl req
-new -x509 -key /etc/ssl/private/dovecot.pem -out
/etc/ssl/certs/dovecot.pem -days 730
here is the result
You are about to be asked to
enter information that will be incorporated
into your certificate request.
What you are about to enter is what is called a Distinguished
Name or a DN.
There are quite a few fields but you can leave some blank
For some fields there will be a default value,
If you enter '.', the field will be left blank.
-----
Country Name (2 letter code) [AU]:FR
State or Province Name (full name) [Some-State]:Bzh
Locality Name (eg, city) []:Brest
Organization Name (eg, company) [Internet Widgits Pty Ltd]:none
Organizational Unit Name (eg, section) []:none
Common Name (e.g. server FQDN or YOUR name) []:mana
Email Address []:olivier.hoarau@funix.org
we relaunch dovecot
systemctl
stop dovecot.service
systemctl start
dovecot.service
You will probably need to accept the new certificate again in the email client
If in the logs you have this type of message
Jan 04
17:59:36 mana.kervao.fr dovecot[29061]: master: Warning:
/power is no longer mounted. See
http://wiki2.dovecot.org/Mountpoints
it's a message point that
has disappeared, just indicate it to dovecot by typing
doveadm mount remove /power
Configuring a IMAP server
The IMAP server stores emails on the server unlike the POP server where emails are stored on the client computer, the advantage with IMAP is therefore to be able to consult your emails almost everywhere within the limit of access of course to the IMAP server. It is also based on dovecot , in the configuration file /etc/dovecot/dovecot.conf we will modify the following line
protocols = imap pop3
on a mageia, we will find a file /etc/doveconf/conf.d/10-mail.conf containing
mail_location = maildir:~/Maildir:LAYOUT=fs
namespace inbox {
inbox = yes
}
mail_privileged_group = mail
to get an a idea of dovecot configuration we will type doveconf -n -P here is the result
# 2.3.20 (80a5ac675d): /etc/dovecot/dovecot.conf
# OS: Linux 6.4.9-desktop-4.mga9 x86_64 Mageia 9
# Hostname: ultra.kervao.fr
listen = *
mail_location = maildir:~/Maildir:LAYOUT=fs
mail_privileged_group = mail
namespace inbox {
inbox = yes
location =
mailbox Drafts {
special_use = \Drafts
}
mailbox Junk {
special_use = \Junk
}
mailbox Sent {
special_use = \Sent
}
mailbox "Sent Messages" {
special_use = \Sent
}
mailbox Trash {
special_use = \Trash
}
prefix =
}
passdb {
driver = pam
}
protocols = imap pop3
ssl = required
ssl_cert = </etc/ssl/certs/dovecot.pem
ssl_key = </etc/ssl/private/dovecot.pem
userdb {
driver = passwd
}
you will have to
abandon the MBOX format in favor of the MAILDIR format to be able to benefit from the
subfolders in your mail tree, otherwise you will only have one
level of folders, this is the purpose of the mail_location parameter. Note that if the 10-mail.conf file does not exist, simply add the line
to the doveconf.conf file. Restart Dovecot
systemctl restart dovecot
Now it will be necessary to modify a certain number of system files to take into account this evolution of the mailbox format. First of all the file /etc/login.defsQMAIL_DIR Maildir
#MAIL_DIR /var/spool/mail
MAIL_DIR Maildir/
#MAIL_FILE .mail
the /etc/profile file
USER=`id -un`
LOGNAME=$USER
#MAIL="/var/spool/mail/$USER"
MAIL="/home/$USER/Maildir"
MAILDIR="~/Maildir"
and to be notified of the arrival of mail, we will also modify the PAM based authentication parameters. In /etc/pam.d/login and /etc/pam.d/su we will add at the end
session optional pam_mail.so dir=~/Standard Maildir
It will probably be necessary to reboot the PC to take these latest changes into account. To now retrieve the emails that are under /var/spool/mail we will retrieve mb2md that can be found here https://github.com/mindbit/mb2md for each user (here Olivier) we will type the command
mb2md -s /var/spool/mail/olivier -d ~/Maildir/
and here is the result
Converting
/var/spool/mail/olivier to maildir: /home/olivier/Maildir
Source Mbox is
/var/spool/mail/olivier
Target Maildir is
/home/olivier/Maildir
Dummy mail system first
message detected and not saved.
7 posts.
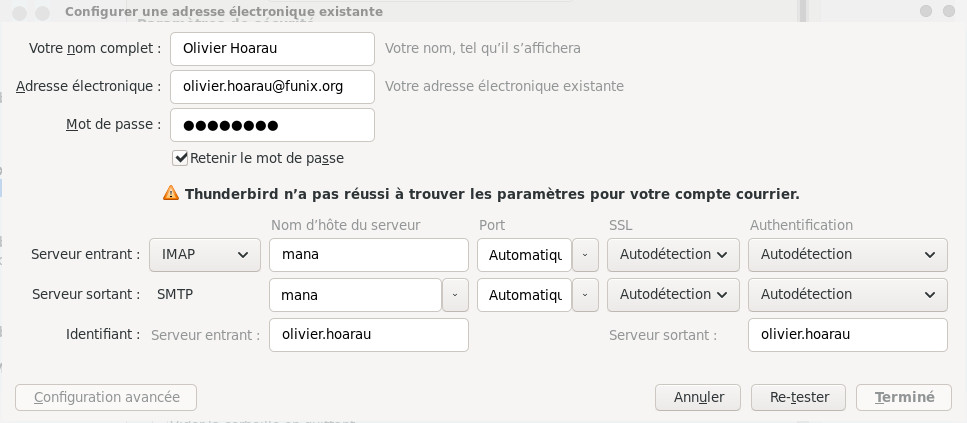
Now under Thunderbird we can take inspiration from this page https://support.mozilla.org/en-US/kb/switch-pop-imap-account but basically we will have to create a new email account by pointing in the incoming mail to your IMAP server
In Thunderbird you will now populate your IMAP account by moving your folders from your old POP account to the new IMAP account simply by drag and drop.
You will then need to accept the security exception to take the local certificate into account. Certificates are visible in Thunderbird at Editions->Settings->Privacy and security and in the Security->Certificates->Manage certificates page. In the Certificate Manager window , the certificate used appears in the Servers tab.
Please note that if the certificate on the server expires, it will no longer be possible to connect. In this case, you will have to delete the obsolete certificate via the Certificate Manager and normally you should have the window to accept the security exception that appears again. It turns out that I struggled once because this window did not appear and I had the incessant message under Thunderbird " verifying mail server capabilities ". As it had worked very well for another Thunderbird account, I recovered the cert_override.txt file that can be found under .thunderbird/account-number.default and which contains the correct certificate details.
webmail Roundcube mail
Installation
tar xvfz
roundcubemail-1.6.8.tar.gz
php -r "if (hash_file('sha384', 'composer-setup.php') === 'dac665fdc30fdd8ec78b38b9800061b4150413ff2e3b6f88543c636f7cd84f6db9189d43a81e5503cda447da73c7e5b6') { echo 'Installer verified'; corrupt'; unlink('composer-setup.php');
this gives
Install verifiedthen we type
Downloading...
Composer (version 2.7.7) successfully installed to:
/home/olivier/web/roundcubemail-1.6.8/composer.phar
Use it: php composer.phar
now we type
cp composer.json-dist composer.json
And
php composer.phar install --no-dev
here is the result
No composer.lock file present. Updating dependencies to latest
instead of installing from lock file. See
https://getcomposer.org/install for more information.
Loading composer repositories with package information
Info from https://repo.packagist.org: #StandWithUkraine
Updating dependencies
Lock file operations: 51 installs, 0 updates, 0 removals
- Locking bacon/bacon-qr-code (2.0.8)
- Locking dasprid/enum (1.0.5)
- Locking doctrine/instantiator (2.0.0)
- Locking guzzlehttp/guzzle (7.8.0)
- Locking guzzlehttp/promises (2.0.1)
- Locking guzzlehttp/psr7 (2.6.1)
- Locking masterminds/html5 (2.7.6)
- Locking myclabs/deep-copy (1.11.1)
- Locking nikic/php-parser (v4.17.1)
- Locking pear/auth_sasl (v1.1.0)
- Locking pear/console_commandline (v1.2.6)
- Locking pear/console_getopt (v1.4.3)
- Locking pear/crypt_gpg (v1.6.7)
- Locking pear/mail_mime (1.10.11)
- Locking pear/net_sieve (1.4.6)
- Locking pear/net_smtp (1.10.1)
- Locking pear/net_socket (v1.2.2)
- Locking pear/pear-core-minimal (v1.10.13)
- Locking pear/pear_exception (v1.0.2)
- Locking phar-io/manifest (2.0.3)
- Locking phar-io/version (3.2.1)
- Locking phpunit/php-code-coverage (9.2.29)
- Locking phpunit/php-file-iterator (3.0.6)
- Locking phpunit/php-invoker (3.1.1)
- Locking phpunit/php-text-template (2.0.4)
- Locking phpunit/php-timer (5.0.3)
- Locking phpunit/phpunit (9.6.13)
- Locking psr/http-client (1.0.2)
- Locking psr/http-factory (1.0.2)
- Locking psr/http-message (2.0)
- Locking ralouphie/getallheaders (3.0.3)
- Locking roundcube/plugin-installer (0.3.2)
- Locking roundcube/rtf-html-php (v2.1)
- Locking sebastian/cli-parser (1.0.1)
- Locking sebastian/code-unit (1.0.8)
- Locking sebastian/code-unit-reverse-lookup (2.0.3)
- Locking sebastian/comparator (4.0.8)
- Locking sebastian/complexity (2.0.2)
- Locking sebastian/diff (4.0.5)
- Locking sebastian/environment (5.1.5)
- Locking sebastian/exporter (4.0.5)
- Locking sebastian/global-state (5.0.6)
- Locking sebastian/lines-of-code (1.0.3)
- Locking sebastian/object-enumerator (4.0.4)
- Locking sebastian/object-reflector (2.0.4)
- Locking sebastian/recursion-context (4.0.5)
- Locking sebastian/resource-operations (3.0.3)
- Locking sebastian/type (3.2.1)
- Locking sebastian/version (3.0.2)
- Locking symfony/deprecation-contracts (v3.3.0)
- Locking theseer/tokenizer (1.2.1)
Writing lock file
Installing dependencies from lock file
Package operations: 23 installs, 0 updates, 0 removals
- Downloading dasprid/enum (1.0.5)
- Downloading bacon/bacon-qr-code (2.0.8)
- Downloading symfony/deprecation-contracts (v3.3.0)
- Downloading psr/http-message (2.0)
- Downloading psr/http-client (1.0.2)
- Downloading psr/http-factory (1.0.2)
- Downloading guzzlehttp/psr7 (2.6.1)
- Downloading guzzlehttp/promises (2.0.1)
- Downloading guzzlehttp/guzzle (7.8.0)
- Downloading masterminds/html5 (2.7.6)
- Downloading pear/console_commandline (v1.2.6)
- Downloading pear/pear-core-minimal (v1.10.13)
- Downloading pear/net_sieve (1.4.6)
- Downloading pear/net_smtp (1.10.1)
- Installing roundcube/plugin-installer (0.3.2):
Extracting archive
- Installing dasprid/enum (1.0.5): Extracting archive
- Installing bacon/bacon-qr-code (2.0.8): Extracting
archive
- Installing symfony/deprecation-contracts (v3.3.0):
Extracting archive
- Installing psr/http-message (2.0): Extracting archive
- Installing psr/http-client (1.0.2): Extracting archive
- Installing ralouphie/getallheaders (3.0.3): Extracting
archive
- Installing psr/http-factory (1.0.2): Extracting archive
- Installing guzzlehttp/psr7 (2.6.1): Extracting archive
- Installing guzzlehttp/promises (2.0.1): Extracting
archive
- Installing guzzlehttp/guzzle (7.8.0): Extracting
archive
- Installing masterminds/html5 (2.7.6): Extracting
archive
- Installing pear/pear_exception (v1.0.2): Extracting
archive
- Installing pear/auth_sasl (v1.1.0): Extracting archive
- Installing pear/console_commandline (v1.2.6):
Extracting archive
- Installing pear/crypt_gpg (v1.6.7): Extracting archive
- Installing pear/console_getopt (v1.4.3): Extracting
archive
- Installing pear/pear-core-minimal (v1.10.13):
Extracting archive
- Installing pear/mail_mime (1.10.11): Extracting archive
- Installing pear/net_socket (v1.2.2): Extracting archive
- Installing pear/net_sieve (1.4.6): Extracting archive
- Installing pear/net_smtp (1.10.1): Extracting archive
- Installing roundcube/rtf-html-php (v2.1): Extracting
archive
11 package suggestions were added by new dependencies, use
`composer suggest` to see details.
Generating autoload files
4 packages you are using are looking for funding.
Use the `composer fund` command to find out more!
Now under MySQL (or phpMyAdmin) we will create the roundcubemail database
CREATE DATABASE roundcubemail CHARACTER SET utf8 COLLATE utf8_general_ci;
we will give administration rights on the database to a particular user
GRANT ALL PRIVILEGES ON roundcubemail.* TO olivier@localhost IDENTIFIED BY 'passwd';
FLUSH PRIVILEGES
Still in the roundcubemail-1.6.8 directory we will type
mariadb roundcubemail -u olivier -p < SQL/mysql.initial.sql
Now I moved roundcubemail to a directory accessible by an apache web server (to adapt to your configuration)
cp -Rf /home/olivier/web/roundcubemail-1.6.8 /var/httpd/roundcubemail
in the httpd.conf file we will add
<Directory
"/var/httpd/roundcubemail">
Options
Indexes FollowSymLinks Includes ExecCGI
AllowOverride
All
Require all
granted
</Directory>
Alias /webmail "/var/httpd/roundcubemail"
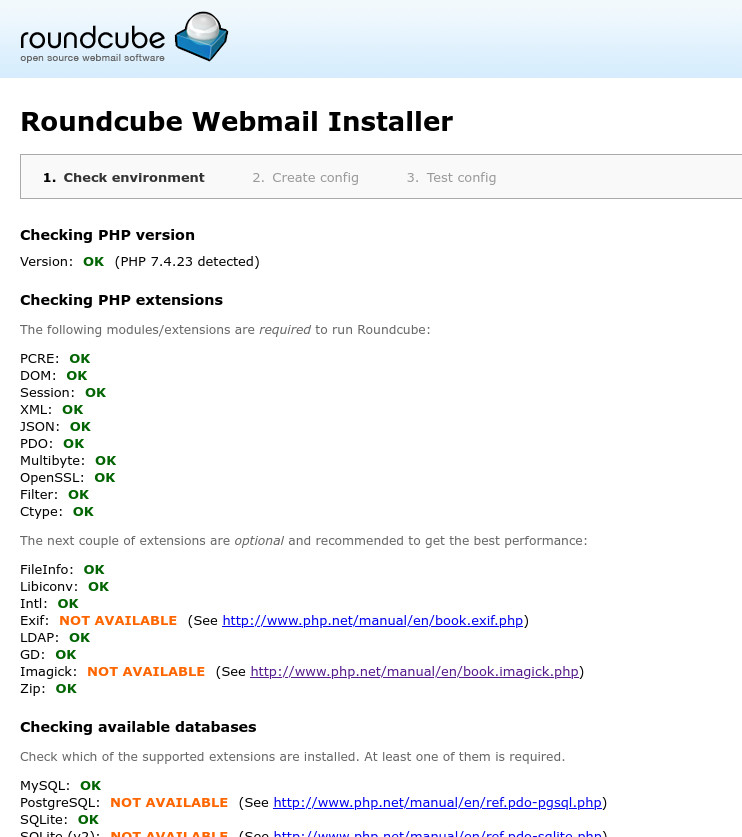
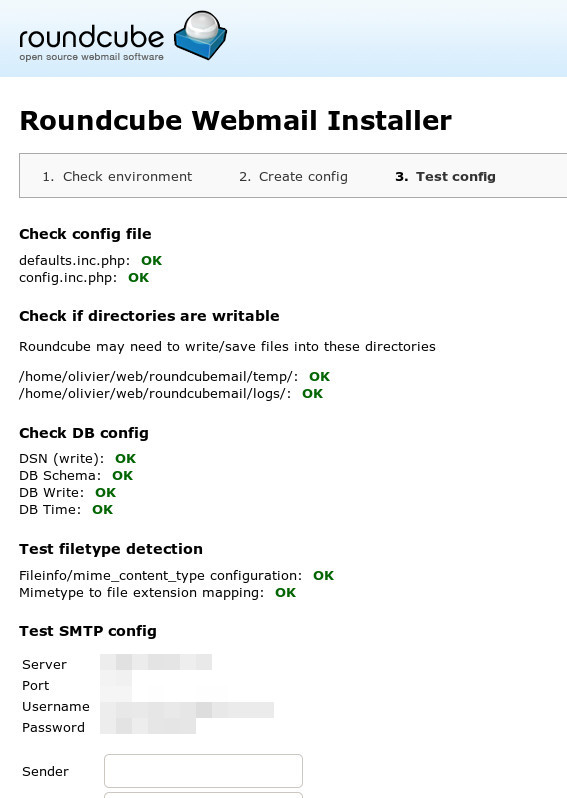
Otherwise, you can access the configuration page by typing http://your-local-server/webmail/installer/ in your browser. The first page tells you if everything is correctly installed.
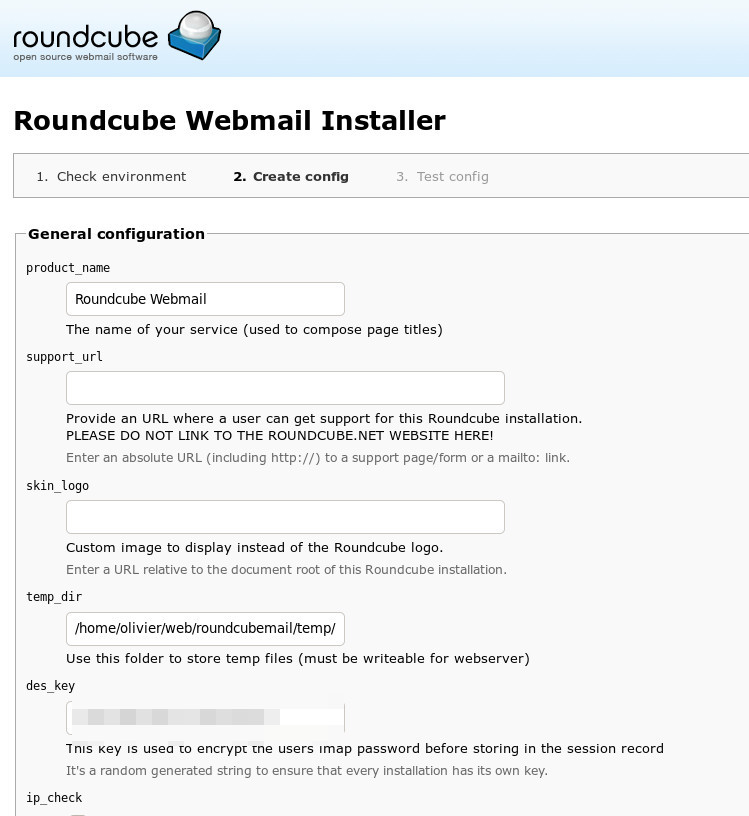
The second page allows you to specify configuration elements, including information for accessing the database, the IMAP server and the SMTP server for sending mail.
We then manually download and install the configuration file which we place under config
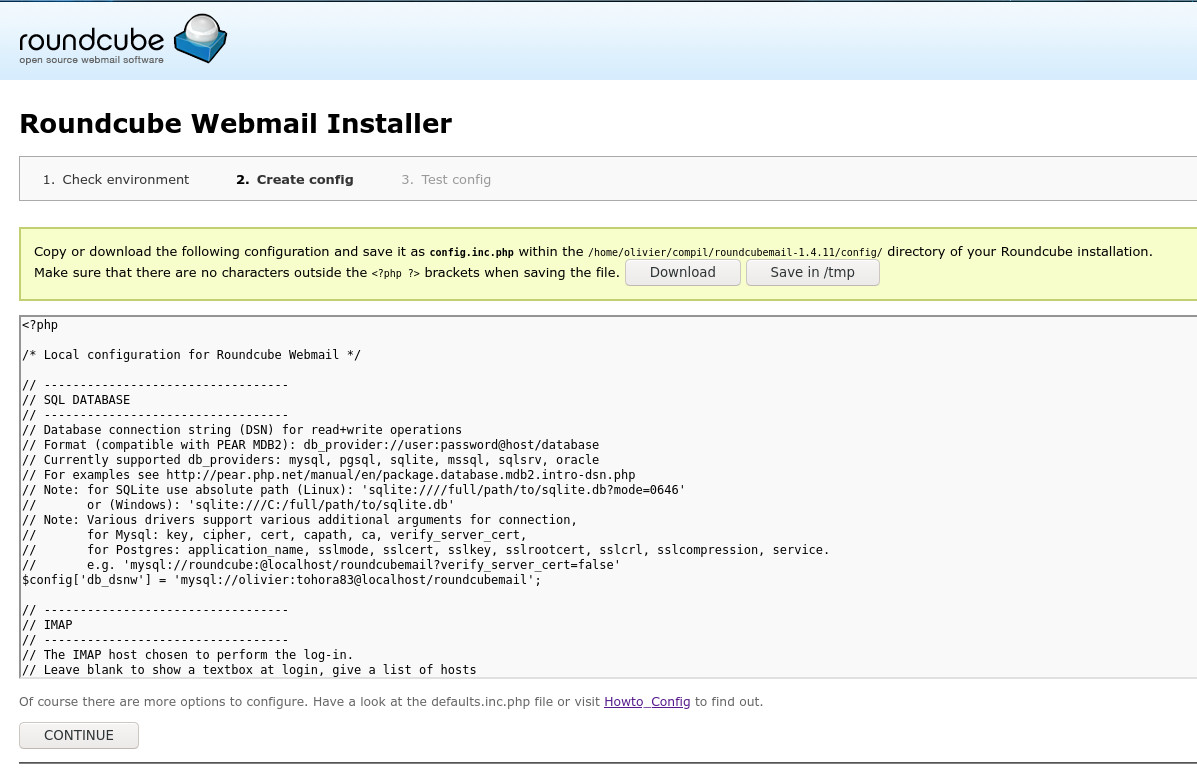
The configuration file is located under /var/httpd/roundcubemail/config/config.inc.php , here are some interesting lines. Access to the local database
$config['db_dsnw'] = 'mysql://olivier:mot-passe@localhost/roundcubemail';
the IMAP mail server
$config['imap_host'] = 'imap-server';
you will then need to delete the directory /var/httpd/roundcubemail/installer
We will think about putting the log and temp files at 777. If you encounter an SMTP error 535 in the config.inc.php file, you will need to add
$config['smtp_user'] = '';
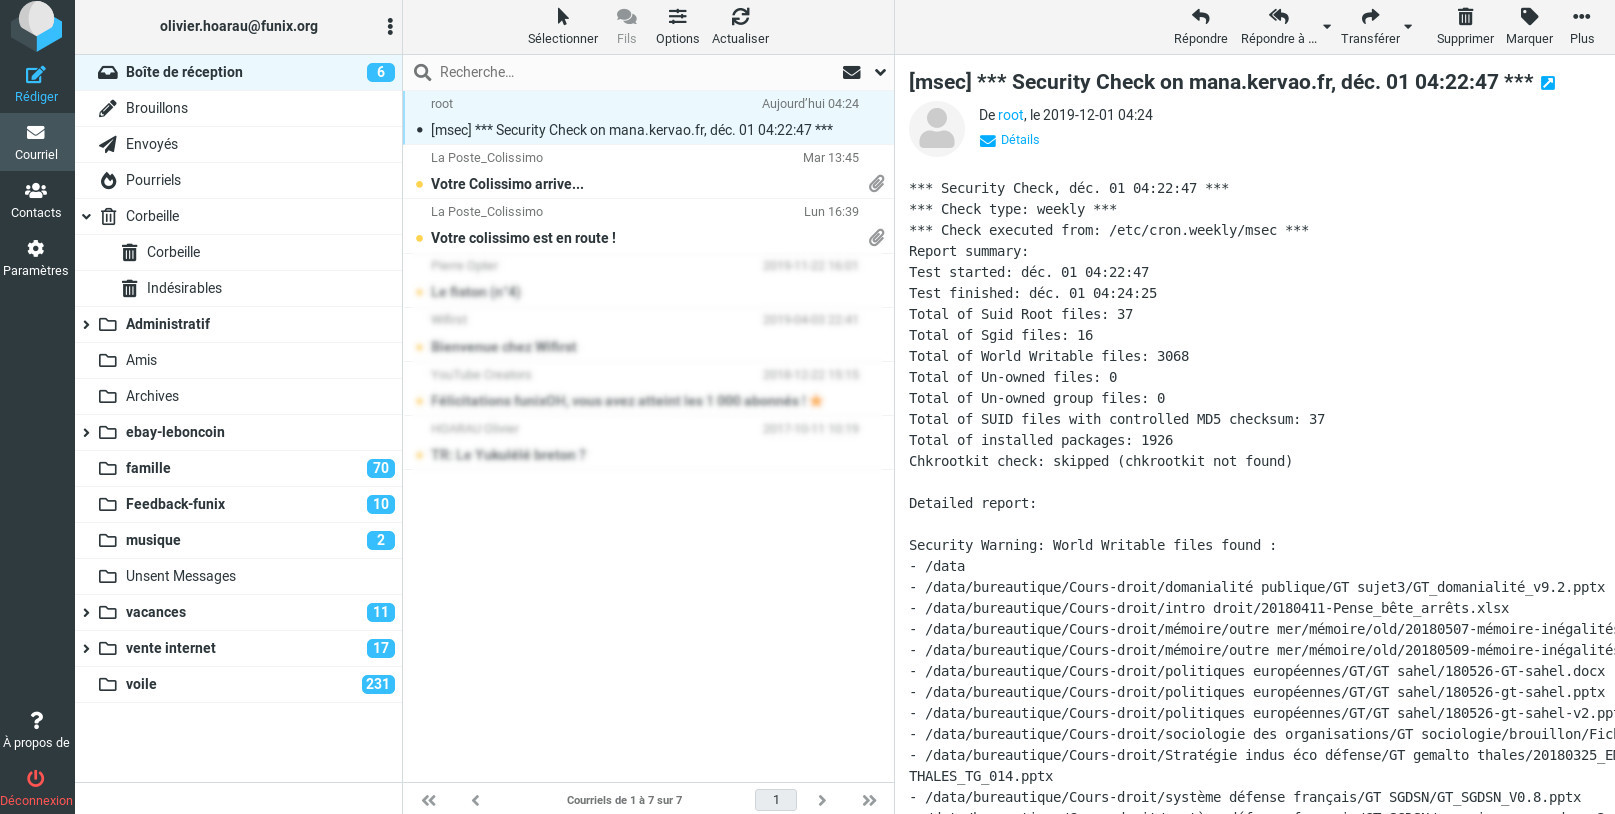
There you go, roundcubemail is ready to use and here is what it looks like on your-server/webmail address from any browser
If you encounter any problems, you can enable debug mode by adding the following lines to the config.inc.php file
$config['debug_level'] = 1;
// Log SQL queries
$config['sql_debug'] =
true;
// Log IMAP conversation
$config['imap_debug'] =
true;
// LDAP conversation log
$config['ldap_debug'] =
true;
// Log SMTP conversation
$config['smtp_debug'] =
true;
and now if the default elastic theme is crashed, it can happen if the version of lessc is too old (case of Mageia 8) you will have to install the npm package as root, then type the commands
npm install -g less
npm install -g less-plugin-clean-css
and in the roundcubemail/skins/elastic directory we will type
lessc --clean-css="--s1 --advanced" styles/styles.less >
styles/styles.min.css
lessc --clean-css="--s1 --advanced" styles/print.less >
styles/print.min.css
lessc --clean-css="--s1 --advanced" styles/embed.less >
styles/embed.min.css
Update
For updates, we will retrieve the latest version which we unzip by typing (note that we must retrieve the full version):
in which we then type
bin/installto.sh /var/httpd/roundcubemail
it replaces a number of files and the end may look like this
WARNING: Replaced config
options:
(These config options have
been replaced or renamed)
- 'default_host' was
replaced by 'imap_host'
- 'smtp_server' was
replaced by 'smtp_host'
Do you want me to fix your
local configuration? (y/N)
y
. backing up the current
config file(s)...
. writing
/var/httpd/roundcubemail/config/config.inc.php...
Done.
Your configuration files
are now up-to-date!
Executing database schema
update.
Updating database schema
(2021081000)... [OK]
Updating database schema
(2021100300)... [OK]
NOTICE: Update
dependencies by running `php composer.phar update --no-dev`
This instance of Roundcube
is up-to-date.
Have fun!
All done.
- Upgrading
pear/pear-core-minimal (v1.10.11 => v1.10.13): Extracting
archive
- Upgrading
pear/net_sieve (1.4.5 => 1.4.6): Extracting archive
- Upgrading
pear/net_smtp (1.10.0 => 1.10.1): Extracting archive
- Upgrading
roundcube/larry (1.6.0 => 1.6.1): Extracting archive
0/38
[>----------------------------] 0%
16/38
[===========>----------------] 42%
23/38
[==>----------] 60%
36/38
[============================>-] 94%
38/38
[=============================] 100%
Generating autoload files
4 packages you are using
are looking for funding.
Use the `composer fund`
command to find out more!
This instance of Roundcube
is up-to-date.
Have fun!
All done.
we return under /var/httpd/roundcubemail we also type
php composer.phar update --no-dev
that's all
Use
I won't insult you by explaining how it works, it's very simple and intuitive. If necessary, there is some documentation here https://docs.roundcube.net/doc/help/1.0/fr_FR/# OVH also provides documentation here https://docs.ovh.com/fr/emails/utilisation-roundcube/
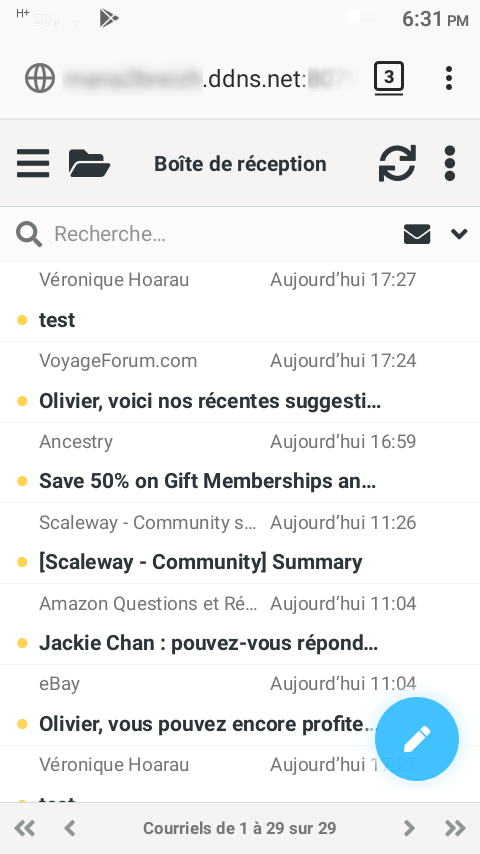
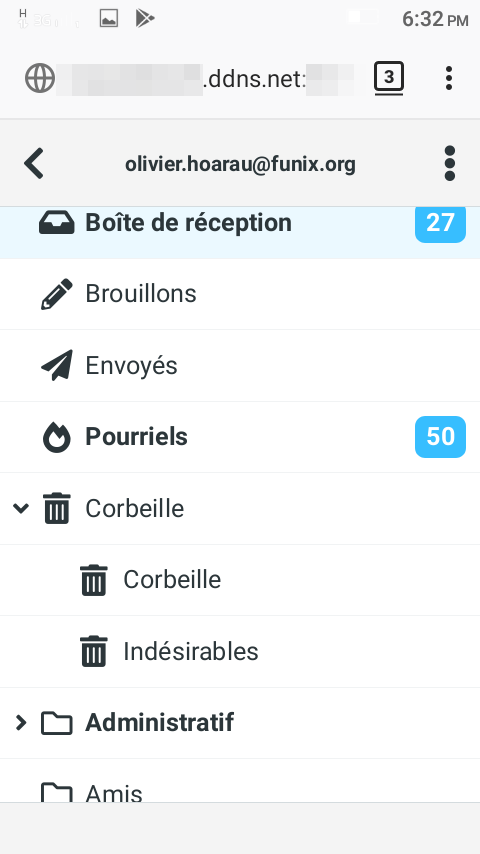
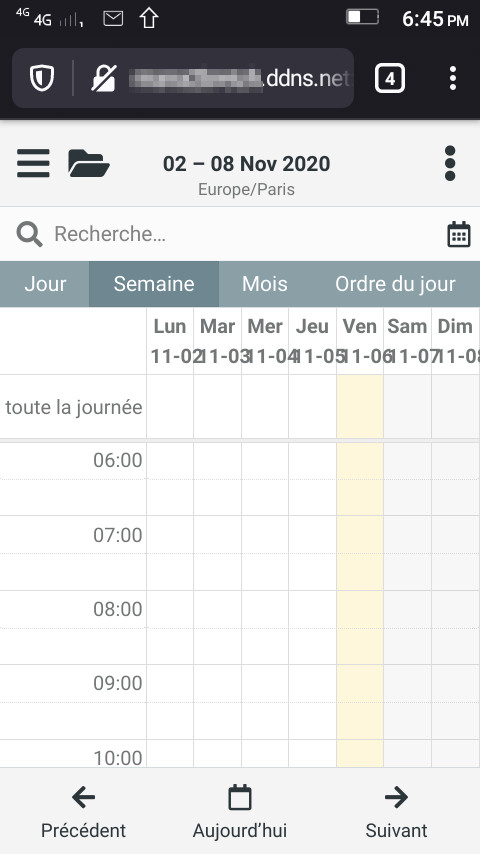
Nothing could be simpler than making your IMAP server accessible on the Internet and you can access your emails from your Android mobile anywhere in the world.
 |
 |
Personalization
Customization with the
installation of a calendar, we will retrieve this plugin here
https://github.com/kolab-roundcube-plugins-mirror
we will retrieve more
precisely calendar-3.5.7.tar.gz, libkolab-3.5.7.tar.gz and libcalendaring-3.5.6.tar.gz
that we will
unzip in the
roundcubemail directory under plugins. We then rename them like
this
mv calendar-3.5.7/ calendar
mv libkolab-3.5.7/ libkolab
mv libcalendaring-3.5.6/ libcalendaring
in the calendar directory we will type the following commands
mv config.inc.php.dist
config.inc.php
cd ../..
bin/initdb.sh
--dir=plugins/calendar/drivers/database/SQL
here is the result of the last command
Creating database schema... [OK]
Now, as root, you will need to install the following packages
urpmi ruby-less ruby-devel
and type
gem install therubyracer
here is the result
Building native extensions.
This could take a while...
Successfully installed
therubyracer-0.12.3
Parsing documentation for
therubyracer-0.12.3
Installing ri
documentation for therubyracer-0.12.3
Done installing
documentation for therubyracer after 0 seconds
1 gem installed
we then type
lessc --clean-css="--s1
--advanced" plugins/libkolab/skins/elastic/libkolab.less
> plugins/libkolab/skins/elastic/libkolab.min.css
lessc --clean-css="--s1
--advanced" plugins/libkolab/skins/larry/libkolab.less >
plugins/libkolab/skins/larry/libkolab.min.css
Finally, we edit config/config.inc.php and add the calendar plugin to the list of extensions
//
----------------------------------
// PLUGINS
//
----------------------------------
// List of active plugins
(in plugins/ directory)
$config['plugins'] = [
'archive',
'zipdownload',
'calendar'
];
and here a calendar icon appears
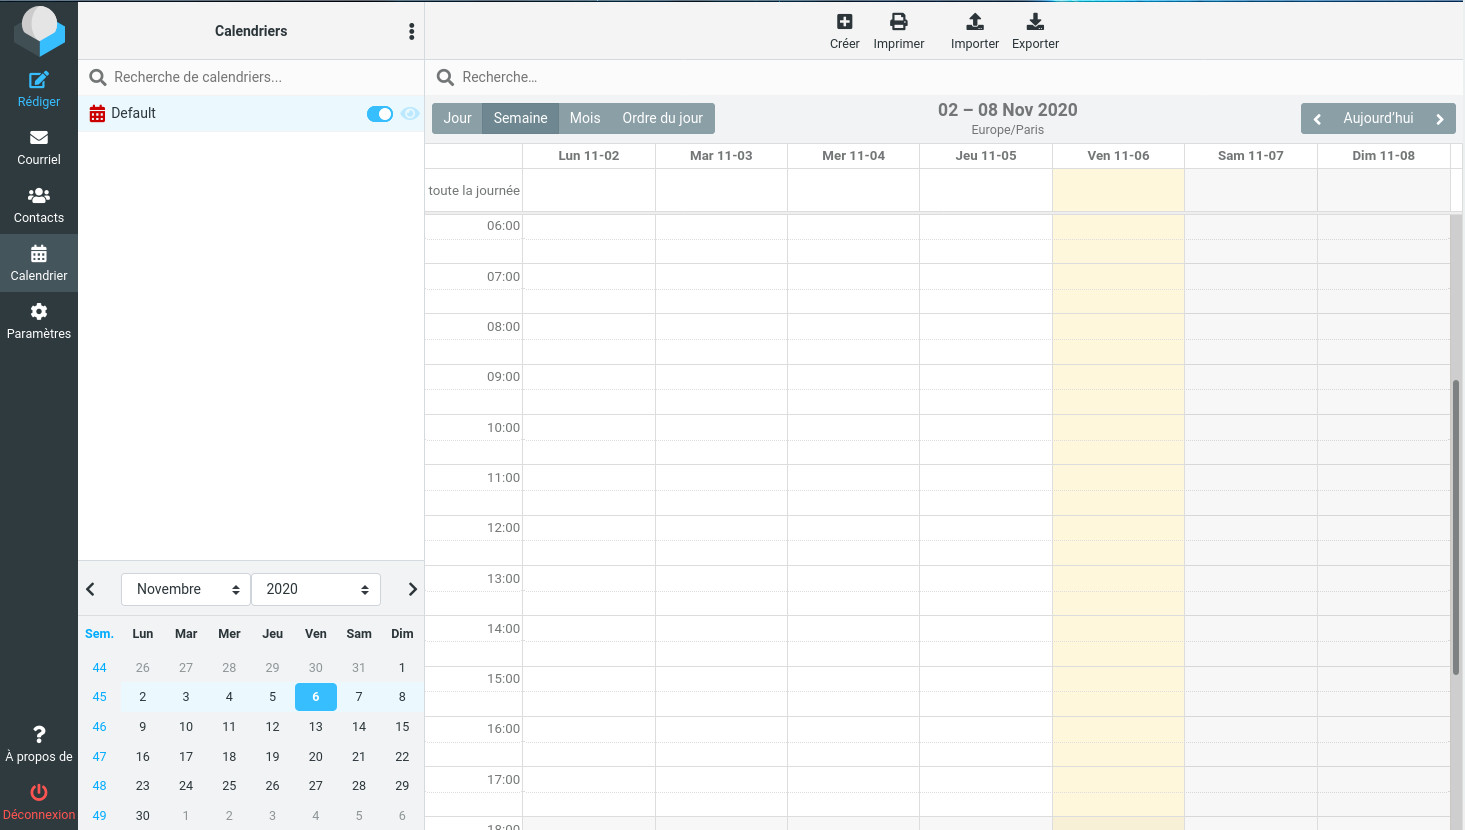
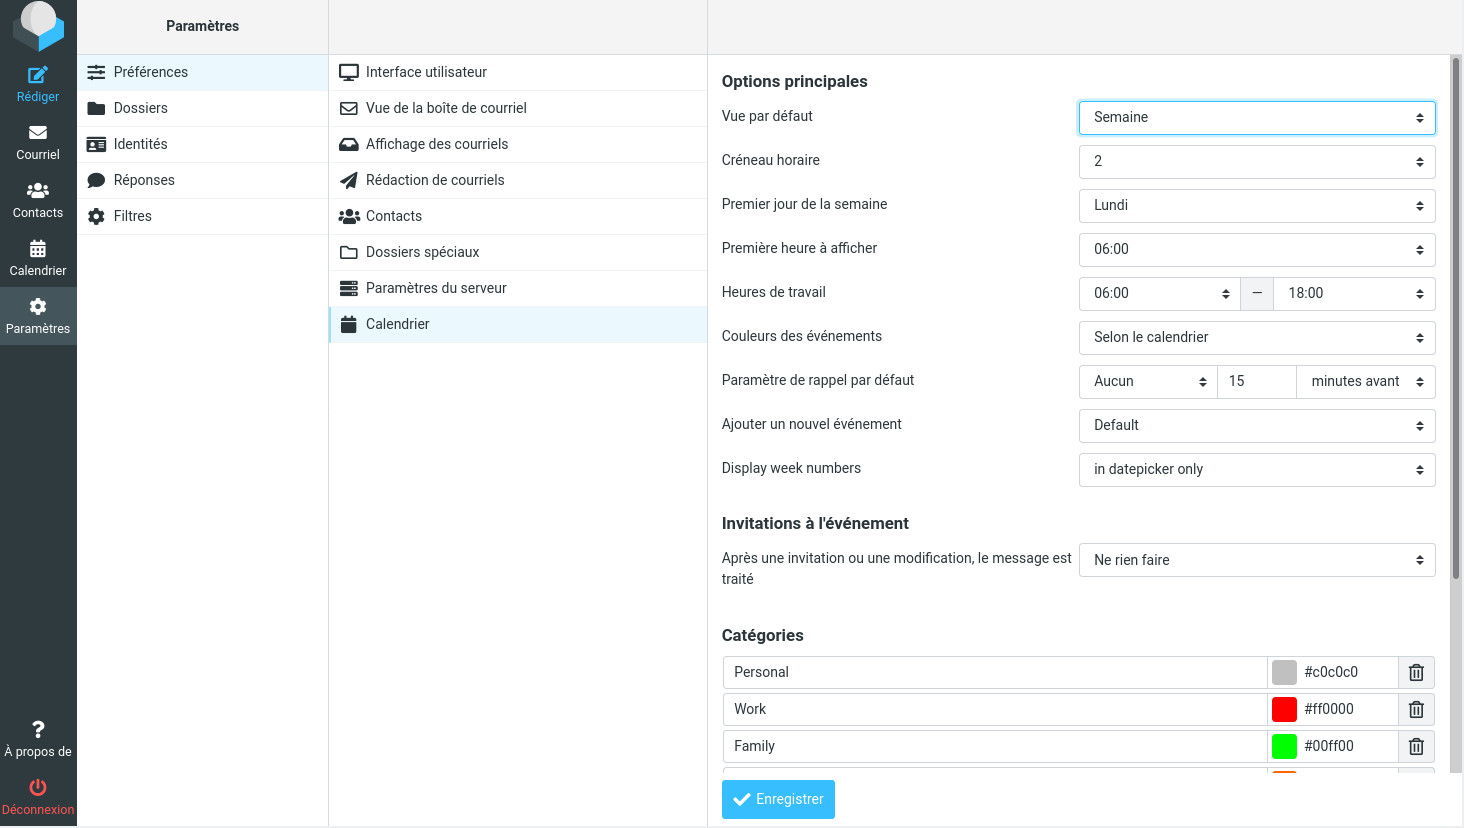
and this is what it looks like for the calendar preferences
php -r "if (hash_file('sha384', 'composer-setup.php') === 'dac665fdc30fdd8ec78b38b9800061b4150413ff2e3b6f88543c636f7cd84f6db9189d43a81e5503cda447da73c7e5b6') { echo 'Installer verified'; corrupt'; unlink('composer-setup.php');
php composer-setup.php
php -r "unlink('composer-setup.php');"
| [ Back to FUNIX home page ] |